• Welcome to ClassicBroncos! - You are currently viewing the forums as a GUEST. To take advantage of all the site features, please take a moment to register. It's fast, simple and absolutely free. So please join our community today!
    If you have problems registering or can't log into your account, please contact Admin.

Front suspension/Caster Process

serial car restorer

Yes, I'll restore almost anything...
Joined
Aug 27, 2024
Messages
742
Loc.
Western Oregon
I don’t believe that is a Tom’s steering box unless they changed them. This is one I got from them a couple of months ago. It has a ridge all the way down the top. I think it is a Lares box. I see the 108 stamped on top.
I agree, looks like the OER/Lares box I put in my '69 a couple months ago.
 

WPS 73 Bronco

Contributor
Sr. Member
Joined
Jan 12, 2023
Messages
542
Loc.
The Woodlands, Tx
So I want to go back to OP Torkman’s issue and solution. He had 7 degree C bushings and the rig wandered. James is suggesting I go with the 7 degree bushings to solve my issue. The Trex absolutely solved his issue.

Help me understand why that might work for me, but not Torkman? I’m still considering the Trex, but you‘ve convinced me to avoid the Heim Steering.
 
OP
OP
Torkman66

Torkman66

Contributor
Sr. Member
Joined
Apr 3, 2022
Messages
853
Loc.
New Braunfels, Tx
Great question. @jamesroney please provide your friendly analysis😊. I have a 2.5” SL used 7° wedges, and got about 1.5° installing eccentrics which overall produced about 4.5° caster. Seems like if the axle had stock factory setup and I added the 7° and eccentric I would have gotten more than 4.5°.
@WPS 73 Bronco you are correct. The Trex solved my problem. While not how I will ever do it again, they solve the caster problem and drivability problem. Folks can argue all they want about method, but it is the final result that matters. I do not need 4 wheel drive so front pinon does not matter to me. When driving home from a car show with Best of Show, Best Paint, and People’s Choice awards in the passenger seat, all while using 1 finger on steering wheel, the whole cut and turn argument just fades away. 😊
I’ll bet if all you did is put on the Trex you would get all the caster you need. They are pricey but they are very well built and they give you back your turn radius. They added 3.5° of caster to my 4.5° for almost 8° and they were set on their most minimal setting. Problem solved.
 

jamesroney

Contributor
Bronco Guru
Joined
Sep 11, 2007
Messages
2,594
Loc.
Fremont, CA
Great question. @jamesroney please provide your friendly analysis😊. I have a 2.5” SL used 7° wedges, and got about 1.5° installing eccentrics which overall produced about 4.5° caster. Seems like if the axle had stock factory setup and I added the 7° and eccentric I would have gotten more than 4.5°.
@WPS 73 Bronco you are correct. The Trex solved my problem. While not how I will ever do it again, they solve the caster problem and drivability problem. Folks can argue all they want about method, but it is the final result that matters. I do not need 4 wheel drive so front pinon does not matter to me. When driving home from a car show with Best of Show, Best Paint, and People’s Choice awards in the passenger seat, all while using 1 finger on steering wheel, the whole cut and turn argument just fades away. 😊
I’ll bet if all you did is put on the Trex you would get all the caster you need. They are pricey but they are very well built and they give you back your turn radius. They added 3.5° of caster to my 4.5° for almost 8° and they were set on their most minimal setting. Problem solved.

My friendly analysis remains unchanged. You want 7 degrees of positive caster to enable confident steering. With a true 2.5 inch suspension lift, and 7 degree bushings, you should be right at 6.5 Most 2.5 suspension lifts are actually 2, and most Broncos run a hardtop and saggy rear springs. And they can achieve a measured 7 degrees of caster with bushings. That's because their FRAME isn't sitting at 4 degrees rake creating negative caster.

This is why my first question is always "what is your frame to axle distance" It's because nobody is consistent on lifts. Then my second question is always "what tires are you running?" Remember that I told @WPS 73 Bronco to change his tires.

So yes, you solved your problem by getting 7 degrees of caster. He will solve his problem by getting 7 degrees of caster too. But he will still need new tires. (although @toddz69 will contend otherwise.)

So while it might appear that my advice produces inconsistent outputs...that's because it has inconsistent inputs.

I don't like the T-Rex arms. I LOVE Jim Cole's arms. (Cage arms, Bloody Knuckle Garage arms) you call them "Duff long arms."

If I'm going to run T-rex arms, I'd just move the wedges. But if I'm cutting wedges, I'm doing the cut and turn instead. So there's that.

If you want to spend the money on caster correct arms that are inferior to the arms the factory gave you...I won't stop you. But those stupid rubber bushings between the arms and the end forgings are WAY too small, and will fail on you.

I didn't hate on your t-rex arms because you ALREADY bought them. No reason to hurt your feelings. But now that I know you better...I'm happy to tell the truth and hurt your feelings now.
 

Attachments

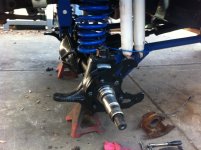
  • D60_knuckle.JPG
    D60_knuckle.JPG
    179.5 KB · Views: 100
Last edited:

serial car restorer

Yes, I'll restore almost anything...
Joined
Aug 27, 2024
Messages
742
Loc.
Western Oregon
His caster measures at 3. He says he's at 2.5 lift (which I don't trust without verification) But let's pretend that he has 2.5 nominal lift front and rear. If so, his 32 inch long radius arm is sitting 4.5 degrees down from stock.

His factory caster WAS 4. He reduced caster with his lift by 4.5 degrees to get to -0.5. He rolled it back by some amount to get to 3.

He has 4 degree bushings.
OK, so let me try this math also. I also have unknown poly bushings in my '69. I have measured axle to frame and have 3.0" lift on both ends. Based on previous measurements in a couple ways, I have 1.0-1.5° caster.

Factory was 4°, 3" lift should have dropped that by about 5° to -1°, so I must have 2° C-bushings now. A set of 7° bushings installed correctly should get me to approximately 6°.
 
OP
OP
Torkman66

Torkman66

Contributor
Sr. Member
Joined
Apr 3, 2022
Messages
853
Loc.
New Braunfels, Tx
I put a lot of weight in what James offers, and he suggests the stab is important. I want it to drive as nice as possible. The darn thing is expensive, but hoping i can notice a difference. However, for you, it is imperative you get at least 7 or 8 degrees caster first. Nothing else you do will make any difference like that will make. I lowered the pitman arm and the trac bar. It made little difference in handling...maybe in bump steer, but not super noticeable. Caster changed it completely. Easy and fun to drive, straight down the road, and feels solid.
 

WPS 73 Bronco

Contributor
Sr. Member
Joined
Jan 12, 2023
Messages
542
Loc.
The Woodlands, Tx
I’ve decided to install the trex, and the clydesdale. I would like to do the stabilizer, but it requires me to relocate the transmission oil cooler to a different location. No big deal, but it’s more work and as you said the stab is expensive. I‘ll wait to hear your report.
 
OP
OP
Torkman66

Torkman66

Contributor
Sr. Member
Joined
Apr 3, 2022
Messages
853
Loc.
New Braunfels, Tx
That's great. I just finished the install so if you run into any challenges, reach out. Few things I learned:
1. The rubber sleeves are very tight and take some time to install. They want to keep popping out one side when installing the other end. I used a rubber mallet, and they eventually went in...be patient and keep at it.
2. You have to jack up the frame so I built two 12" x 12" x 12" blocks from 2x12 planks, screwed and stacked them to make a 12" high block platform that my jack stands could sit on and then used my floor jack for lifting and lowering the axle up and down as needed.
3. Once you have the frame up and the axle lowered, removing the springs is easy, then just grease up the wedges good and install was pretty straight forward...just time consuming. I had an extra set of hands helping which was very helpful at that stage. The darn axle wants to slide off the jack when moving it in and out. You have to move axle rearward and forward a few times to get the arms into the frame mounts.
4. Once you have it all together and are ready to adjust the arms, ensure that ALL FOUR bolts are nice and loose. I suggest not using the lower eccentric adjusting nuts to change the angle...the brackets are easy to bend a bit. Instead, to set initial caster ( if you just want the minimum caster from the arms without any adjustment...I think that is like 3 degrees), then put a jack under the pinon (bolts all loose) and jack up the pinon. That rotates the entire axle (decreasing caster). Once the bottom bolts are bottomed out, you can then tighten all four bolts up and take it for a spin. See what the minimum 3 degrres increase does. If you want to add more caster (pinon moves down), then again loosen up all four bolts and push pinon down rotating axle and increasing caster. Then tighten up all four bolts. Again, I found the eccentric lower bolt system not the best way to adjust.
5.Finally, because the axle is one long tube, whatever change is made to one side is automatically changed on the other side. So assuming you have all four bolts loose, whatever caster you have on the left will be pretty close to that on the right. Just tighten all four bolts. IOW, don't think you need to turn both eccentric bolts the same. Assuming all for bolts are loose, the entire axle moves together.

I knew my caster from the alignment I had done previously. I used my digital angle tool to locate a place on the bottom of each knuckle where the degrees matched what the caster was. I drew a line to ensure the leading edge of the angle tool always was set on the exact same spot. That way, when I was done with install, I used the angle tool on the exact same location and saw the increase from 4.3 to 7.5. As previously noted, I just used the minimum setting on the arms. I probably could have used the original non-adjustable arms given they also have about 3 degrees built in caster, but I wanted to have the ability to adjust more if required.

 

jamesroney

Contributor
Bronco Guru
Joined
Sep 11, 2007
Messages
2,594
Loc.
Fremont, CA
That's great. I just finished the install so if you run into any challenges, reach out. Few things I learned:
1. The rubber sleeves are very tight and take some time to install. They want to keep popping out one side when installing the other end. I used a rubber mallet, and they eventually went in...be patient and keep at it.
2. You have to jack up the frame so I built two 12" x 12" x 12" blocks from 2x12 planks, screwed and stacked them to make a 12" high block platform that my jack stands could sit on and then used my floor jack for lifting and lowering the axle up and down as needed.
3. Once you have the frame up and the axle lowered, removing the springs is easy, then just grease up the wedges good and install was pretty straight forward...just time consuming. I had an extra set of hands helping which was very helpful at that stage. The darn axle wants to slide off the jack when moving it in and out. You have to move axle rearward and forward a few times to get the arms into the frame mounts.
4. Once you have it all together and are ready to adjust the arms, ensure that ALL FOUR bolts are nice and loose. I suggest not using the lower eccentric adjusting nuts to change the angle...the brackets are easy to bend a bit. Instead, to set initial caster ( if you just want the minimum caster from the arms without any adjustment...I think that is like 3 degrees), then put a jack under the pinon (bolts all loose) and jack up the pinon. That rotates the entire axle (decreasing caster). Once the bottom bolts are bottomed out, you can then tighten all four bolts up and take it for a spin. See what the minimum 3 degrres increase does. If you want to add more caster (pinon moves down), then again loosen up all four bolts and push pinon down rotating axle and increasing caster. Then tighten up all four bolts. Again, I found the eccentric lower bolt system not the best way to adjust.
5.Finally, because the axle is one long tube, whatever change is made to one side is automatically changed on the other side. So assuming you have all four bolts loose, whatever caster you have on the left will be pretty close to that on the right. Just tighten all four bolts. IOW, don't think you need to turn both eccentric bolts the same. Assuming all for bolts are loose, the entire axle moves together.

I knew my caster from the alignment I had done previously. I used my digital angle tool to locate a place on the bottom of each knuckle where the degrees matched what the caster was. I drew a line to ensure the leading edge of the angle tool always was set on the exact same spot. That way, when I was done with install, I used the angle tool on the exact same location and saw the increase from 4.3 to 7.5. As previously noted, I just used the minimum setting on the arms. I probably could have used the original non-adjustable arms given they also have about 3 degrees built in caster, but I wanted to have the ability to adjust more if required.
So now that you have done your homework, How EXACTLY can you change the caster between the left and right side? (without ball joint eccentrics?)

I'll tell you how. You cant. If you measure your caster with the toe set incorrectly, it will give you a false reading. So the computer generated caster number will include the king pin inclination in the caster calculation. When that happens, then setting the toe correctly results in a different reported caster value. I laugh every time I see a caster change on an open knuckle 44 after an "alignment."

Once you realize that you can't actually introduce any cross caster into the housing...then you start to realize that it doesn't matter where you measure the caster. So then you can measure the caster right off the face of the diff cover. (or the case spreader flats) When your cover is sitting at 5 degrees, you caster is sitting at 7. (yours isn't...because you have those idiotic camber eccentrics installed sideways as caster corrections...but I digress.)

Anyway, I would never tell a stranger to give me their pinion angle, and I'll tell them their caster. But I'm pretty sure I could tell you...and you would "get it." Take care,
James.
 

ntsqd

heratic car camper
Joined
Jan 30, 2005
Messages
5,953
Loc.
Upper SoKA
Years ago I was sitting around a New Year's camp fire in Trukhaven Hills and someone asked the guy who had just recently had his CJ/YJ "Halfbreed" featured on the cover of 4WD & Sport Utility if it was done.
He replied "Hell, if it's done, it's For Sale."

I took that to mean that a particular vehicle can be re-invented as often as the owner wants to do it. Just because it's complete and doing well on the trails or in the shows doesn't mean that you can't be building better sub-assemblies and then installing them when complete.
 

WPS 73 Bronco

Contributor
Sr. Member
Joined
Jan 12, 2023
Messages
542
Loc.
The Woodlands, Tx
I have BREAKING NEWS… thanks to James asking the simple question do I really know what I have.

I don't have a 2 1/2" lift. The distance I show is 7.5" in the front between the top of the axle and the frame, and 7." in the back. My ride has a back to front slope on it. As noted in an earlier post, I have 3 degree of caster.

So I'm now wondering if I should be replacing coil springs and rear leaf springs while I'm at it. If I’m doing that, Should I be adding a 1.5” lift and eliminating my 1” body lift….???? I’ve already got Bilstein shocks, but I’m assuming that would change if I added the lift?

I’m looking for optimum steering and ride quality. So many things to consider.

1764710879714.png
 
Last edited:
Top