• Welcome to ClassicBroncos! - You are currently viewing the forums as a GUEST. To take advantage of all the site features, please take a moment to register. It's fast, simple and absolutely free. So please join our community today!
    If you have problems registering or can't log into your account, please contact Admin.

1969’s build thread

OP
OP
1969

1969

Contributor
Sr. Member
Joined
Feb 28, 2022
Messages
712
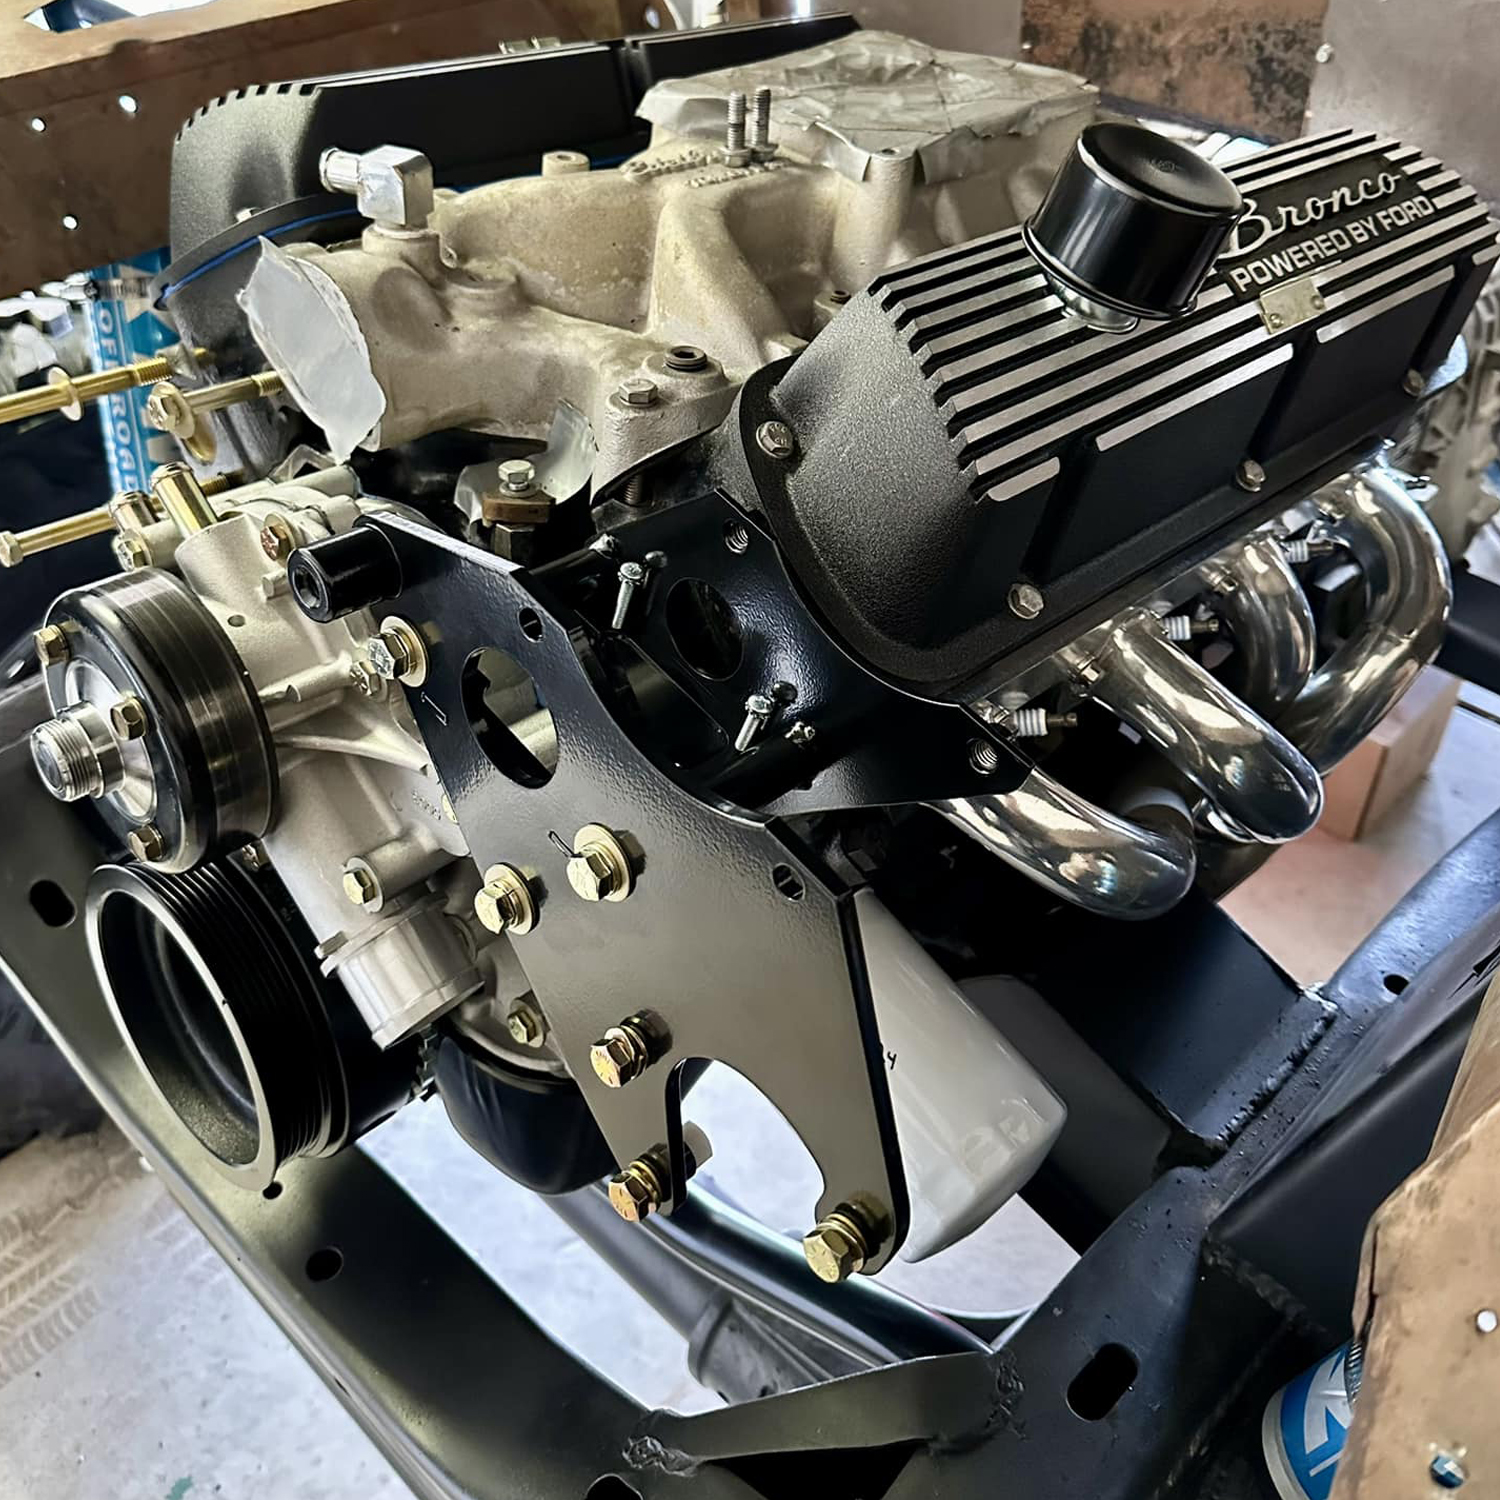
More work on the Explorer serpentine conversion. I went with a Cloyes Street True Roller Timing Set, p/n 9-1138. The Harmonic Balancer from Dampnerdudes is also really nice. Currently waiting on the passenger side bracket to come back from powder coat, and I’ll be ordering the Wild Horses Saginaw conversion bracket to finish it off. Everything has gone fairly smooth during this conversion.

IMG_4375.jpeg

IMG_4357.jpeg

 
OP
OP
1969

1969

Contributor
Sr. Member
Joined
Feb 28, 2022
Messages
712
I installed the Explorer serpentine Saginaw conversion bracket from Wild Horses. The bolts it came with were one size too big for the bolt holes on my head. Popped over to the hardware store and got the correct bolts and it went on no problem. Very nice bracket!

IMG_4411.jpeg
 

DirtDonk

Contributor
Bronco Guru
Joined
Nov 3, 2003
Messages
48,743
Make sure you run a robust ground cable between the alternator body (one of the mounting bolts is most convenient) and the engine. Or a common grounding area that the engine is grounded to.
And of course, make sure that grounding the engine to the body is a prime part of your grounding theme.

With all the painting and powder coating going on, I'd just make sure that bonding everything (or at least most things) together is a good practice. Because they're no longer going to be contacting at normally conducting surfaces.
Presumably the body is going to paint at some point too? If so, it becomes just as necessary sometimes, to bond body panels together with extra straps or wires, to make sure that they are all part of the system.
After all, it doesn't do you any good to ground the headlights and turn signals to the core support, when it's no longer getting good contact with the rest of the body. Especially the few grounded panels that there normally are.
Keep it in mind when welding any new panels, or painting any old ones, where they need a good connection. Like the windshield frame, as another example.

Paul
 
OP
OP
1969

1969

Contributor
Sr. Member
Joined
Feb 28, 2022
Messages
712
Make sure you run a robust ground cable between the alternator body (one of the mounting bolts is most convenient) and the engine. Or a common grounding area that the engine is grounded to.
And of course, make sure that grounding the engine to the body is a prime part of your grounding theme.

With all the painting and powder coating going on, I'd just make sure that bonding everything (or at least most things) together is a good practice. Because they're no longer going to be contacting at normally conducting surfaces.
Presumably the body is going to paint at some point too? If so, it becomes just as necessary sometimes, to bond body panels together with extra straps or wires, to make sure that they are all part of the system.
After all, it doesn't do you any good to ground the headlights and turn signals to the core support, when it's no longer getting good contact with the rest of the body. Especially the few grounded panels that there normally are.
Keep it in mind when welding any new panels, or painting any old ones, where they need a good connection. Like the windshield frame, as another example.

Paul

Thank you for the information Paul. It’s always appreciated. I’ll have to revisit this when I get to doing a new wiring harness. The body won’t be going to paint, I want to keep it looking old and original for as long as possible. The only body work will be fixing the floor pans and firewall so I’m not flint stoning it.
 

Yeller

Contributor
Bronco Guru
Joined
Mar 27, 2012
Messages
6,653
Loc.
Rogers County Oklahoma
Thank you for the information Paul. It’s always appreciated. I’ll have to revisit this when I get to doing a new wiring harness. The body won’t be going to paint, I want to keep it looking old and original for as long as possible. The only body work will be fixing the floor pans and firewall so I’m not flint stoning it.
let the body tell the story of its history :)
 
OP
OP
1969

1969

Contributor
Sr. Member
Joined
Feb 28, 2022
Messages
712
Thanks to a guy on Facebook for the correct belt part number for utilizing the explorer serpentine conversion with the Saginaw pump.

Gates K060876

IMG_4656.jpeg

IMG_4658.jpeg
 
OP
OP
1969

1969

Contributor
Sr. Member
Joined
Feb 28, 2022
Messages
712
Pulled my original heater box today.. not sure how it ever worked whenever it last did? Luckily no rust at all in and around there.

IMG_4723.jpeg

IMG_4724.jpeg
 
OP
OP
1969

1969

Contributor
Sr. Member
Joined
Feb 28, 2022
Messages
712
OP
OP
1969

1969

Contributor
Sr. Member
Joined
Feb 28, 2022
Messages
712
I’ve been working on getting the front clip off. I got some of the bolts off no problem, but I’ve had to cut most of them off. Everything looks to be in good shape for the most part. No signs of rust at all.

Is the front of the core support slightly angled back?

IMG_4807.jpeg

IMG_4808.jpeg

IMG_4809.jpeg
IMG_4810.jpeg
 
Last edited:

Speedrdr

Contributor
Not so wise OLD owl
Joined
Nov 27, 2017
Messages
1,523
Loc.
Paris, MS
I’ve been working on getting the front clip off. I got some of the bolts off no problem, but I’ve had to cut most of them off.

Is the front of the core support slightly angled back?

View attachment 926498
View attachment 926499
View attachment 926500 View attachment 926501
According to my neighbor who restored a ‘73, the core support indeed has a slight rear slant. I honestly don’t remember how mine looked before I unbolted and angle grinder assaulted mine.

Randy
 
OP
OP
1969

1969

Contributor
Sr. Member
Joined
Feb 28, 2022
Messages
712
According to my neighbor who restored a ‘73, the core support indeed has a slight rear slant. I honestly don’t remember how mine looked before I unbolted and angle grinder assaulted mine.

Randy

Good to know. I’ll have to find some measurements to verify everything is where it should be.
 

DirtDonk

Contributor
Bronco Guru
Joined
Nov 3, 2003
Messages
48,743
Looks ok from here, but I don't know the exact angle it sits at. Won't hurt to verify and have another data point!
With it all apart, are you going to clean up the cut for the steering box? Or better yet, do what Ford did and add a "bump-out" to the panel? Cover up the hole basically.
I always thought a pre-made panel you could buy would be a good benefit. But in reality, if you can weld, you can probably bend your own.
A pre-made one though, would make it easier for those that can't easily weld it in place, and just use screws or rivets.

Paul
 
OP
OP
1969

1969

Contributor
Sr. Member
Joined
Feb 28, 2022
Messages
712
Looks ok from here, but I don't know the exact angle it sits at. Won't hurt to verify and have another data point!
With it all apart, are you going to clean up the cut for the steering box? Or better yet, do what Ford did and add a "bump-out" to the panel? Cover up the hole basically.
I always thought a pre-made panel you could buy would be a good benefit. But in reality, if you can weld, you can probably bend your own.
A pre-made one though, would make it easier for those that can't easily weld it in place, and just use screws or rivets.

Paul

I’ll have to take some measurements and compare.

I’m not sure yet what I’ll do about that hole that a previous owner cut with a torch :rolleyes:
 

.94 OR

Contributor
Bronco Guru
Joined
Jul 5, 2009
Messages
1,802
I'm guessing it is tipped back at close to the same angle the engine tilts back so the fan and radiator run parallel.
 
OP
OP
1969

1969

Contributor
Sr. Member
Joined
Feb 28, 2022
Messages
712
Passenger side - measured straight back off the firewall
IMG_4827.jpeg


Driver side - measured straight back off the firewall
IMG_4825.jpeg
 
Top