• Just a reminder that you won't be able to start new posts or reply to existings posts in the Archive forum.

    This is where all the old posts go so they can still be used for reference and searched.
  • Welcome to ClassicBroncos! - You are currently viewing the forums as a GUEST. To take advantage of all the site features, please take a moment to register. It's fast, simple and absolutely free. So please join our community today!
    If you have problems registering or can't log into your account, please contact Admin.

I'm making some progress on Frank!

JWMcCrary

Contributor
Bronco Guru
Joined
Oct 14, 2004
Messages
5,001
I must tip my hat to a fellow southerner for taking on such a project. I passed on several Broncos that would have taken the work you are putting into this one.

My sister and her husband just moved to Mobile, my brother-in-law was transferred down there. I haven't visited them yet, but when I do...I may want to look you up.

GREAT JOB
Windale
 
OP
OP
Bronco Ben

Bronco Ben

Contributor
Jckofalltrdes master/none
Joined
Aug 9, 2003
Messages
2,356
Loc.
Coffeeville, Alabama
tipping my hat back at ya! thanks for the kind coments all. Its been a busy day, by the way I hate spot welds! lol.........been grinding those all day long and drilling and prying. My brother in law came over to help, I've been working on this thing since around 9:00am this morning with only a few small breaks. I'll post a few pics later before I shut down for the night! The drivers side rocker panel is half off as is the drivers side inner rocker. More to come so stick around!
Ben

10:14 pm update
well later after supper progress has been slow. My bro in law went home around 7:00 or so, and I've basically gotten my outer rocker on drivers side removed (all of it) and am now working on the inner rocker panel. I've encountered some rust in the drivers side door striker post (bottem) and the door hindge drivers side bottem, not sure yet what will become of it. I would like to replace them both but, with money tight, I may well just go with what I have and patch what I can for now. I really hate to get this far into a restore and have to settle for something "shitty" like a couple rusted panels, but I guess thats life. :(
well here is a few pics of the rocker removed on drivers side, I spread ospho all over the new parts I installed so it should be dry in the morning so I can finish welding and possibly priming those parts.
Ben
 

Attachments

  • Broncoprogress13 006.jpg
    Broncoprogress13 006.jpg
    48.2 KB · Views: 51
  • Broncoprogress13 008.jpg
    Broncoprogress13 008.jpg
    37.8 KB · Views: 53
Last edited:

MnkyBiz

Bronco Guru
Joined
Jan 17, 2004
Messages
3,758
Loc.
Northern VA/DC
Ben!

keep on rocking!!!!

All you need to do, is keep checking your measurements & you will be the happiest camper of all!

Looks gooood!
 
OP
OP
Bronco Ben

Bronco Ben

Contributor
Jckofalltrdes master/none
Joined
Aug 9, 2003
Messages
2,356
Loc.
Coffeeville, Alabama
ok guys here is where I'm at, tell me what to do next! It aint pretty but facts are facts! I'm thinking at this point I just need to hold up and replace the door striker plate and at least the drivers side door hinge plate (upright piece). As you all know I'm on a limited budget, but then again I also Hate RUST!.........one panel over the course of couple weeks plus the door hinge piece over two weeks wouldnt kill me, I believe I could swing that too. I just have to keep telling myself patience my friend, I mean I want this thing right. But then agian what I have will probably last a long time as it is??? what to do??

and as far as everyone and measurements, where are you guys measureing from and how many different areas............i.e. top of door jam from striker post to hinge post? i.e. ground up to bottem of inner rocker??
in picture number two the inner rocker lines up well with the brace coming from under the floor pan area, so I figure I'm good in that respect. Then the new inner rocker is cut out (at rear) to come all the way up to the bottem of the same brace, so I feel I am good in that area. THen in the front of the new inner rocker it goes exactly where it needs to with the corner of the door hinge plate and where the old inner rocker stopped, so I believe that area is good!..........anything else I need to take into consideration?
help!
Ben
 

Attachments

  • Broncoprogress14 058.jpg
    Broncoprogress14 058.jpg
    34.4 KB · Views: 41
  • Broncoprogress14 060.jpg
    Broncoprogress14 060.jpg
    48.4 KB · Views: 38
  • Broncoprogress14 059.jpg
    Broncoprogress14 059.jpg
    42.2 KB · Views: 46
  • Broncoprogress14 057.jpg
    Broncoprogress14 057.jpg
    46.5 KB · Views: 28
  • Broncoprogress14 056.jpg
    Broncoprogress14 056.jpg
    44.3 KB · Views: 30
  • Broncoprogress14 055.jpg
    Broncoprogress14 055.jpg
    43.4 KB · Views: 38
  • Broncoprogress14 054.jpg
    Broncoprogress14 054.jpg
    48.4 KB · Views: 33
  • Broncoprogress14 053.jpg
    Broncoprogress14 053.jpg
    44.8 KB · Views: 62

MnkyBiz

Bronco Guru
Joined
Jan 17, 2004
Messages
3,758
Loc.
Northern VA/DC
Ben,

I am getting ready to leave for a training week of hell...I mean fun.

Anyway, I'll be able to answer in the early am & late evening.

These are the types of measurements that I mean. Now as you remove different areas, you will take different measurements, butyou get the idea! You want to take diagonals, & measurements from different heights!

Bill
 

Attachments

  • measurements.jpg
    measurements.jpg
    81 KB · Views: 163
OP
OP
Bronco Ben

Bronco Ben

Contributor
Jckofalltrdes master/none
Joined
Aug 9, 2003
Messages
2,356
Loc.
Coffeeville, Alabama
tonights update 10:45 pm....alabama time! ;D

here is a few pics of what I've done tonight, kinda slow when your working by yourself and taking out spot welds, floorpans, especially the trans tunnel. I made a couple boo boo's and cut out a little to much on the edge of the tunnel but it will have to work. Hopefully I can get a lot more done on DR. Kings Birthday since I'm off! untill then, I'll keep pluggin away a little at a time!
wish me well!
Ben

#1 drivers side outter kick panel those holes going down at an angle actually are the floor pan outter spot welds!
#2 passenger side mock up of floor pan
#3 passenger side with floor pan removed and partically ground/sanded!
#4 passengers side outter kick panel and those holes going down are also the floor pan outter spot welds.
#5 drivers side pan removed and ready prep work to install new pan
#6 a mock up of both pans installed
#7 bothpans out and shot from back angle
#8 shot from the front with both front floor pans removed and trans tunnel


I keep telling myself, "self you can get it back together" but man I really wonder if she will ever ride again at times!
 

Attachments

  • Broncoprogress15 021.jpg
    Broncoprogress15 021.jpg
    50.5 KB · Views: 42
  • Broncoprogress15 020.jpg
    Broncoprogress15 020.jpg
    49.8 KB · Views: 39
  • Broncoprogress15 017.jpg
    Broncoprogress15 017.jpg
    46.2 KB · Views: 55
  • Broncoprogress15 018.jpg
    Broncoprogress15 018.jpg
    51.1 KB · Views: 31
  • Broncoprogress15 016.jpg
    Broncoprogress15 016.jpg
    47.9 KB · Views: 28
  • Broncoprogress15 019.jpg
    Broncoprogress15 019.jpg
    42.4 KB · Views: 30
  • Broncoprogress15 015.jpg
    Broncoprogress15 015.jpg
    34.9 KB · Views: 27
  • Broncoprogress15 014.jpg
    Broncoprogress15 014.jpg
    34.9 KB · Views: 23

Flash69

Bronco Guru
Joined
Jul 21, 2004
Messages
2,429
Loc.
Southwest Va
I feel for you Ben.. Keep plugging away and you will be driving it before you know it. Your pics brings back a lot of nightmares. I mean memories.
 
OP
OP
Bronco Ben

Bronco Ben

Contributor
Jckofalltrdes master/none
Joined
Aug 9, 2003
Messages
2,356
Loc.
Coffeeville, Alabama
I feel for you Ben

Don't feel for me! I'm the type of guy who has always wanted to restore "something" an old Mustang, an old truck or just something. Dealing with old mustangs I've known many times what I was getting myself into (Or at least I think I knew lol). I Love to bring something back from near death. ( guess I shoulda been a doctor). My first mustang was a 1964 1/2 coupe that was rusted worse than this bronco, although it never made it back. My buddy had a 1965 mustang from california (fresno) that was RUSTless to say the least, his mother and father had stored it under a shed for 15 years once it made it to alabama, and lets just face facts Alabama sheetmetal compaired to California (or just plain outwest) sheetmetal are just not created equal. But sometimes you settle for what you can afford. Not to many people would have tried to save this old bronco I have from the boneyard. And really and truely if I hadnt got such a good price on it, it would probably be there today! I can truely say though, if this bronco doesnt turn out like I want it then it will be my fault and no one else's. I have a decent shop, a new welder,plenty of hand and electric tools, and hopefully by the end of this restore, I'll even have a body stand (which is something I always wanted for my Mustangs from the first day I saw one at a Mustang show in P, cola years ago). The fact that I have more to work with than ever before is motivation enough to slow down and try to do a better job every step of the way. I still get a little to antsey at times and try to take short cuts,especially when it comes to money involved. (women tend to have negative effects on old car restoration when money is involved lol). Time is another factor, I read all the time where "ole joe-blow" took his auto down and brought it back to like new in a year, sometimes even 8 months, 6 months or even less time. That all goes back to money, help involved and money is time and time is money depends on how you look at it. Then there is the equipment you have to work with. Heck if I had a lift, a body stand, a media blaster and full time crew like chip foose or stacey david, and the experience I have now (undermy belt) it would definetly be rough on some of the other big name shops......but I guess that would be true with many of us hobby restoration types huh?
anyways, back to what I was saying. Don't feel sorry for me, feel happy for me that I have the means to do what I'm doing. It's more enjoyable Flash to restore one from as far down as we've brought ours back from because we will know every inch of the way how they were put together, how they are put together and what it takes to get it all done. ;D

Ben
 

MnkyBiz

Bronco Guru
Joined
Jan 17, 2004
Messages
3,758
Loc.
Northern VA/DC
Ben you rock!

The best way to deal with these Broncos is to just plow full steam ahead! If you get to a point & have questions, shoot 'em off! I'll measure my rig up one side & down another if you need that type of help!!!!!

Keep it up!

Bill
 
OP
OP
Bronco Ben

Bronco Ben

Contributor
Jckofalltrdes master/none
Joined
Aug 9, 2003
Messages
2,356
Loc.
Coffeeville, Alabama
thanks mnkybiz,
yea its pretty much been full steam ahead for me for a while, But i still have a ton of work to do! Spot welds to grind, paint to remove, all that kinda stuff. IF I run across a measurement I need I'll be sure to holler..until then I'll just chip away at it, and one day I'll look back and smile!

Ben
 

Flash69

Bronco Guru
Joined
Jul 21, 2004
Messages
2,429
Loc.
Southwest Va
Your comments are very true Ben. I had every bolt in mine out and replaced them with Stainless or grade 8. Me or my sons touched every bolt on it. It is enjoyable to do, BUT, at times it sure got frustrating, thats when you have to take a break. I was doing too much dreaming about it. I was working on it all day and working on it all night in my sleep. funny huh.
 

4x4Alaska

Sr. Member
Joined
Feb 5, 2002
Messages
894
Loc.
Wasilla, Alaska
Well Ben, your keeping me motivated to work on my 70 too....it's in pretty sad shape and like yours, is getting brought back from the dead. Pretty much every piece of sheetmetal is getting cut off and replaced. thanks for keeping me motivated man and keep up the good work....
 
OP
OP
Bronco Ben

Bronco Ben

Contributor
Jckofalltrdes master/none
Joined
Aug 9, 2003
Messages
2,356
Loc.
Coffeeville, Alabama
thanks guys for in the encouragement! I promise it definetly helps after a long night of grinding spot welds!


update 9:45 pm alabama time
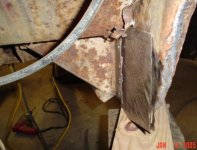
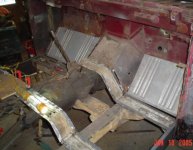
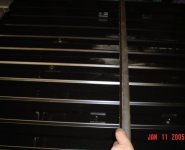
here is a few shots of the JBG full bed panel, and the #4 rail underneath it. I drilled the holes to plug weld thru to weld the bed rail to the bed panel. Then I grinded the drill debris down so it will lay flat when I weld it down. The only problem I had with the JGB panel is that the #4 bed support rail wouldnt line up because of those two small brackets on each side in the middle. Picture #4 !
enjoy!

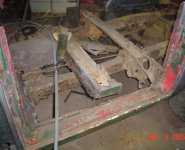
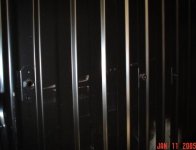
#1 old bed panel with old bed support rail still tack welded on (major rust)
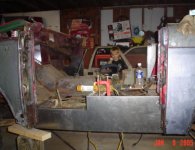
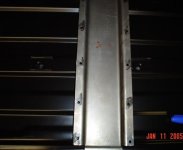
#2 new JBG bed panel with/bed support rail called #4 rail in their catalog
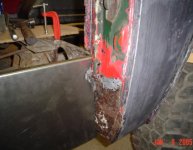
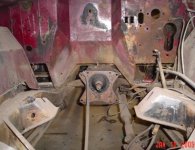
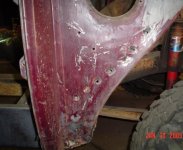
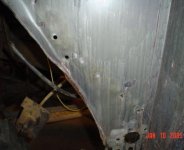
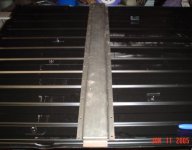
#3 Where the rail will have to sit about an inch back from origional since these little brackets are in the way (I'm guessing they are seat belt brackets) they are pictured in #4 picture
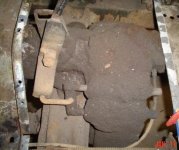
#4 the brackets I spoke of in #3
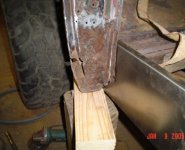
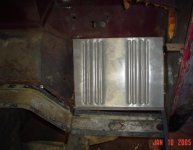
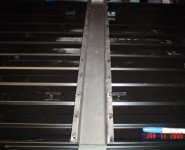
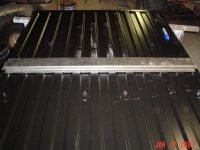
#5 channel drilled and ready for spot welds to be added thru plug holes to bed panel
#6 drilled and ground plug holes waiting for the welder
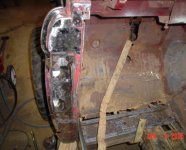
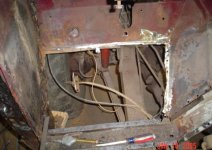
#7 back seat hold down nuts from under side of bed panel
#8 WTH is this black mass? possibly a transfer case???:)

over all I think the JBG bed panel is an excellent piece. I'm just guessing but did all broncos in 1970 have a rear seat? Would they have left seat belts out on rear seat if it didnt come with a rear seat? I dont remember mine having these brackets!........made a short night of it, more to come! enjoy
 

Attachments

  • Broncoprogress16 009.jpg
    Broncoprogress16 009.jpg
    25 KB · Views: 29
  • Broncoprogress16 006.jpg
    Broncoprogress16 006.jpg
    26.8 KB · Views: 35
  • Broncoprogress16 005.jpg
    Broncoprogress16 005.jpg
    32.2 KB · Views: 28
  • Broncoprogress16 004.jpg
    Broncoprogress16 004.jpg
    26.9 KB · Views: 40
  • Broncoprogress16 003.jpg
    Broncoprogress16 003.jpg
    34.6 KB · Views: 32
  • Broncoprogress16 002.jpg
    Broncoprogress16 002.jpg
    35.7 KB · Views: 52
  • Broncoprogress16 001.jpg
    Broncoprogress16 001.jpg
    46.7 KB · Views: 38
  • Broncoprogress16 008.jpg
    Broncoprogress16 008.jpg
    44.6 KB · Views: 51

MnkyBiz

Bronco Guru
Joined
Jan 17, 2004
Messages
3,758
Loc.
Northern VA/DC
Ben!

Looks great! Wow, I am impressed with the quality of the product!!!!

Keep the inspiring photos coming!

I'll post some wiring updates on the MOnkey Mobile this weekend!

Cheers!

Bill
 
OP
OP
Bronco Ben

Bronco Ben

Contributor
Jckofalltrdes master/none
Joined
Aug 9, 2003
Messages
2,356
Loc.
Coffeeville, Alabama
I wonder what it would hurt to move the brace at the very back of the bed panel back 1"? Does anyone know? The reason for this is the brackets for the seat belts hit the channel running across in the origional position.
Thanks
Ben
 

Flash69

Bronco Guru
Joined
Jul 21, 2004
Messages
2,429
Loc.
Southwest Va
The main posts sit on that channel Ben. There would have to be some kind of modifying to them if you did that.
 
Top