


Community
Message Forum
Photo Gallery
Event Calendar
Book Reviews
Bronco Wallpaper
Bronco FAQ
Link Back to CB!
Photo Gallery
Event Calendar
Book Reviews
Bronco Wallpaper
Bronco FAQ
Link Back to CB!
Buy / Sell


Bronco Tech
3 Arm Wiper Setup
Fix Motor Mount
Roll Cage Braces
Throttle Body 65mm
Wheel Alignment
Heat Riser Replacement
Vent Window Repair
Center Console Mount
Straighten Bumper
Ford 6R80 6 spd
More Tech...
Fix Motor Mount
Roll Cage Braces
Throttle Body 65mm
Wheel Alignment
Heat Riser Replacement
Vent Window Repair
Center Console Mount
Straighten Bumper
Ford 6R80 6 spd
More Tech...

Install the app
-
Welcome to ClassicBroncos! - You are currently viewing the forums as a GUEST. To take advantage of all the site features, please take a moment to register. It's fast, simple and absolutely free. So please join our community today!If you have problems registering or can't log into your account, please contact Admin.
You are using an out of date browser. It may not display this or other websites correctly.
You should upgrade or use an alternative browser.
You should upgrade or use an alternative browser.
Mass Confusion Build. After 2 1/2 years It started!!
- Thread starter 71massbronco
- Start date
OP
OP
71massbronco
Bronco Guru
- Joined
- Mar 13, 2011
- Messages
- 1,321
Doesn't look like the heats botherin ya too much;D
keep her goin.
Oh man, the day I cut and bent the pan, I wasn't in the garage five minutes before I was drenched. I had ripped a contact so I was wearing my glasses and couldn't keep the lenses clear for two minutes because of the sweat pouring off. Think we made it up 94 -96 degrees. Laid low yesterday and am going to go back at it tomorrow. Predicting 78 degrees. Perfect bronco weather.
")
OP
OP
71massbronco
Bronco Guru
- Joined
- Mar 13, 2011
- Messages
- 1,321
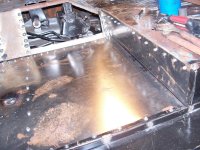
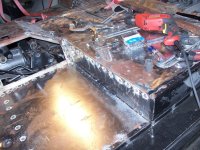
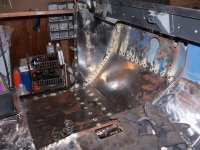
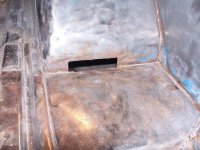
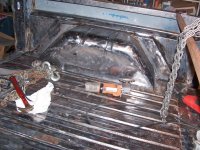
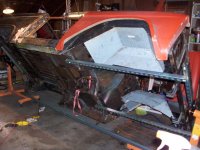
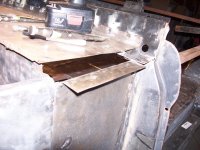
Last pan is in and welded! Now all I have to do are small patches and finish welding those up. Then, it's time to hammer on the body and get all the rough spots smoothed out.
Attachments
OP
OP
71massbronco
Bronco Guru
- Joined
- Mar 13, 2011
- Messages
- 1,321
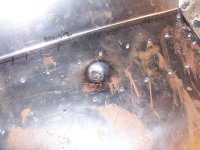
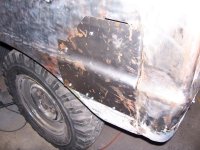
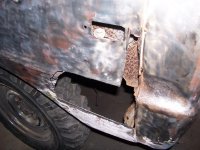
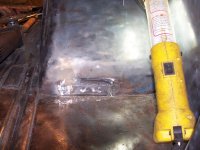
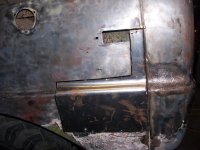
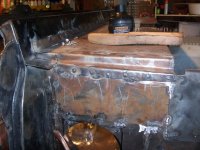
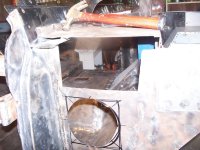
Have a dent in the DS lower back quarter panel that needed to be addressed. I initially cut out the lower panel from the donor bronco, then decided the donor panel was too far gone to continue with trying to attach it. So I manned up and cut out some of the stock steel left over from the pan metal. Tried my hand at bending the metal to the factory curve of the body panel. I plan on cutting out the panel that is bolted on, so the seams will line up. Have to say I am happy with the result and it matches up pretty good. Also fixed the rear tub patch, and the the other major repair, between the bed and seat platform.
Attachments

OP
OP
71massbronco
Bronco Guru
- Joined
- Mar 13, 2011
- Messages
- 1,321
Thanks Dave,
I am shooting for a festival here in Acushnet in September. My wife is opening up a new dance school here and we want to use it to promote it in a parade, so she is encouraging me to work on it to get it done by then. It will be close, but I think I can get this to happen. It's going to come off the frame shortly so I can paint the undercarriage, and button it up by then. It is getting extremely close to paint.
Had to laugh at myself, reading back in April or May, thought I was really close to paint like within a couple of weeks. %) That was the optimist in me, I guess.
I am shooting for a festival here in Acushnet in September. My wife is opening up a new dance school here and we want to use it to promote it in a parade, so she is encouraging me to work on it to get it done by then.
It will be close, but I think I can get this to happen. It's going to come off the frame shortly so I can paint the undercarriage, and button it up by then. It is getting extremely close to paint. Had to laugh at myself, reading back in April or May, thought I was really close to paint like within a couple of weeks. %) That was the optimist in me, I guess.
OP
OP
71massbronco
Bronco Guru
- Joined
- Mar 13, 2011
- Messages
- 1,321
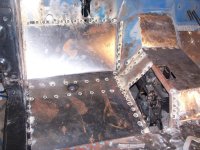
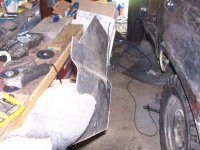
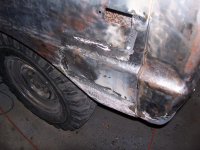
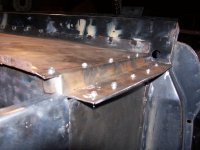
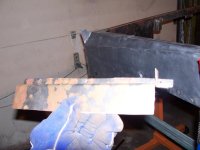
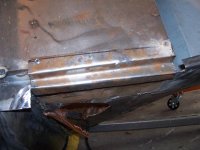
Here is the almost finished back quarter panel after the installation of the new metal. Tried taking the easy way out by cutting out part of the red 71's quarter panel, but it was so rusty, I would just be replacing it again soon anyhow. This is my first attempt of forming a panel curve from scratch. Not perfect, but it will get the job done. I still have to weld up the bottom to close up the gap.
Since it was an odd shaped patch, I used a trick I saw on Youtube, were you oversize the patch, cut it down with it attached, so you cut the original metal at the same time you cut the patch guaranteeing a good fit. It worked out pretty well.
Since it was an odd shaped patch, I used a trick I saw on Youtube, were you oversize the patch, cut it down with it attached, so you cut the original metal at the same time you cut the patch guaranteeing a good fit. It worked out pretty well.
Attachments

Put the putty to it!!;D
dave67fd
Bronco Guru
- Joined
- Sep 24, 2010
- Messages
- 2,863
Thanks Dave,
I am shooting for a festival here in Acushnet in September. My wife is opening up a new dance school here and we want to use it to promote it in a parade, so she is encouraging me to work on it to get it done by then.
Had to laugh at myself, reading back in April or May, thought I was really close to paint like within a couple of weeks. %) That was the optimist in me, I guess.
Well hope you guys have good luck with the school and can't wait to see the pics of the rig in the parade. Wish the wifey on this end was more of a Bronco nut.lol
OP
OP
71massbronco
Bronco Guru
- Joined
- Mar 13, 2011
- Messages
- 1,321
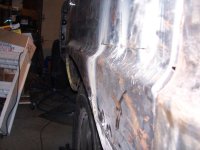
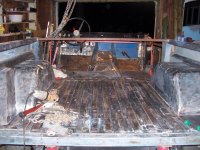
Today continued taking paint off the bed and hitting all the nooks and crannies as best I can. Wish I had a sandblaster. As I tear away the top layer of paint I find the occasional rust through. It is getting very close to getting the first layer of primer on.
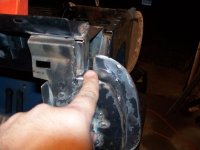
Also got one step closer to getting my fenders and grill to line up. Kind of had a eureka moment when taking a closer look at why the panels weren't lining up. Way back in this build thread somebody showed a pic of how to mount the lower windshield cowl. looked to be about 1/4 inch of space in between the post and the cowl. So I welded it up that way. that was the source of a few of my alignment issues.
Got to looking at my stock bronco I bought back in Feb and noticed that the section was butted right up against the doorpost. So i broke out the grinder and took out my welds and sucked each door in about 1/4 inch. I think that will help with that nasty hood gap with the fenders in the future. %)
Attachments
OP
OP
71massbronco
Bronco Guru
- Joined
- Mar 13, 2011
- Messages
- 1,321
Got my primer and paint in this week. I will surprise you with the blue I decided to go with. Not too much to show, as I am still fixing the small areas of imperfections and aren't really picture worthy. Every time I think I am getting ready for primer, something else pops up, like a new area of rust that has to get patched. It just never seems to end.%)
I find I have about a 2 to 3 hour attention span on the Bronco. Can't do anymore time on it or I get the burn out. I love working on the Bronco, but man, just seems like the progress gets real slow with all the little detail patches that come up. Today and also priced out some 30 x 9.5's at a local tire place.
So the putty is flyin' in the garage, and soon the paint will be too.
OP
OP
71massbronco
Bronco Guru
- Joined
- Mar 13, 2011
- Messages
- 1,321
depends on what day in september....i would love to come down and IF mine is back together. Take a step back and be proud. you have done a ton and i for one, am damn proud of what you have accomplished!
As always, thanks for the kind words, Tasker. The parade is September 9, Sunday morning I think it would be cool to get some EB's in there. Maybe monkey and his newfounded RI Bronco Club will come over! (Make sure your rig can maintain a stable engine temperature at idle for a little over 45 minutes.It is a very slooooow parade.)
Soooo, I have a month to rock this wagon.
The weeds around the house are a little longer, the water in the pool is a little cloudy, but the Bronco is coming along.
Moving right along, I agree with Randy on this Good job!!
OP
OP
71massbronco
Bronco Guru
- Joined
- Mar 13, 2011
- Messages
- 1,321
Thanks guys.
Well, I am officially feeling old. Can't bend and stretch the way I used to so I think that has been some of the cause of the small amount of EB building endurance I have been experiencing lately. So I took a trip to Lowes, and HF to get myself some stuff to make life working on the EB a little easier.
I am calling it Project ROTIS right now. I made myself a Rotisserie. But it doesn't have enough clearance yet to make a complete 360 hence Project ROTIS.
Bought three 10 ft sections of unistrut/channel Cut them down, bolted the ends to the old engine stand I had and the new one I just bought at HF. So for about a hundred bucks, got myself some easier access.
Attachments

OP
OP
71massbronco
Bronco Guru
- Joined
- Mar 13, 2011
- Messages
- 1,321
good job! Deadfish Dave has a similiar setup and works great.....
I think that's where I got the idea from. Can't remember, the recall seems to be going on me too!%)
monkeylovetrees
Sr. Member
Keep going man I looks good let me know what you need me and the club have parts all over the place and any time you got cruises going on let me know
OP
OP
71massbronco
Bronco Guru
- Joined
- Mar 13, 2011
- Messages
- 1,321
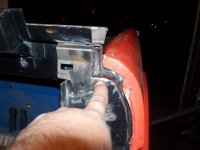
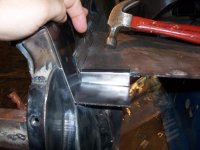
I have been putting this part of the build off for a while and finally bit the bullet and started tackling it. I the little end caps on my custom lower cowl sans the fresh air vent. I was dreading doing the bends and fitment, for good reason, as I went through two pieces of metal trying to get the cuts and then bends right. then found a couple of iffy welds I had done earlier. ....Then my welder quit working. My feeder switch wasn't activating the spool. I took it apart, everything seemed ok. I turned it on being very careful but not careful enough and I shorted the trigger to the housing blowing out the speed controller.
I bent the other side and will weld up the rest tomorrow. Figures, I was on my last patch and this happens. I ran over to HF and picked up another cheapie to get me through.
Also picked up some new wheels locally from another car guy. Were the ones I was looking for! The mass casualty is slowly recovering and looking respectable without the four mismatch hoopty mobile wheels.
Except for the hoopty covers I had to pull out of the garage at the last minute because we are getting squalls shortly.
Attachments

Similar threads
City: Stockton
Price: $3500
- Replies
- 3
- Views
- 558
- Replies
- 29
- Views
- 1K
- Replies
- 13
- Views
- 2K