


Community
Buy / Sell


Bronco Tech
3 Arm Wiper Setup
Fix Motor Mount
Roll Cage Braces
Throttle Body 65mm
Wheel Alignment
Heat Riser Replacement
Vent Window Repair
Center Console Mount
Straighten Bumper
Ford 6R80 6 spd
More Tech...
Fix Motor Mount
Roll Cage Braces
Throttle Body 65mm
Wheel Alignment
Heat Riser Replacement
Vent Window Repair
Center Console Mount
Straighten Bumper
Ford 6R80 6 spd
More Tech...

-
Welcome to ClassicBroncos! - You are currently viewing the forums as a GUEST. To take advantage of all the site features, please take a moment to register. It's fast, simple and absolutely free. So please join our community today!If you have problems registering or can't log into your account, please contact Admin.
You are using an out of date browser. It may not display this or other websites correctly.
You should upgrade or use an alternative browser.
You should upgrade or use an alternative browser.
What have you done to your Bronco today?
- Thread starter Heus33
- Start date


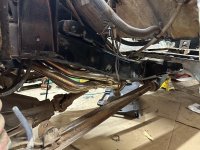
Finished installing the new stock height body bushings…yay! Small victory, but a good feeling nonetheless. Got the last bit of the frame painted. Removed the front wheel tubs. Eventually I plan to start reassembly and my wifey will be so happy with that. lol.
Small steps but that’s all I seem to manage now.
Randy
Small steps but that’s all I seem to manage now.
Randy
Attachments
Randy, is that solely POR15 on the frame? Looks good.Finished installing the new stock height body bushings…yay! Small victory, but a good feeling nonetheless. Got the last bit of the frame painted. Removed the front wheel tubs. Eventually I plan to start reassembly and my wifey will be so happy with that. lol.
Small steps but that’s all I seem to manage now.
Randy
- Joined
- Nov 3, 2003
- Messages
- 49,356
What’s your source for that? Got a link?Upgraded my original alternator to a 100 amp GM/Delco in a Ford case alternator.
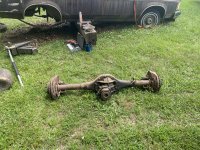
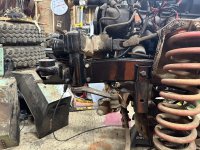
I tore apart the rear suspension to replace the shock mounts and found the reason for the lean I've had. I also repainted the beadlock rings on two of the wheels.


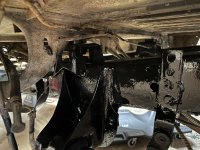
POR 15 base coat and a “top coat” of gloss enamel. It was a decision I made to brush the POR 15 on rather than buy a $10 throw away paint gun and do the job right. The enamel sprayed on was to maybe prevent some with rock chipping and help make it look more finished, but when you get within 5 feet, it’s obvious that I wasn’t successful. Lol.Randy, is that solely POR15 on the frame? Looks good.
Randy
Looks better that my frame does, as we speak. Just gathering ideas for good ways to cleanup without breaking the bank.POR 15 base coat and a “top coat” of gloss enamel. It was a decision I made to brush the POR 15 on rather than buy a $10 throw away paint gun and do the job right. The enamel sprayed on was to maybe prevent some with rock chipping and help make it look more finished, but when you get within 5 feet, it’s obvious that I wasn’t successful. Lol.
Randy
While POR 15 isn’t cheap, it does a good job sealing a frame that has some rusting. Don’t make my mistake and clean the metal to a bright finish. I did too good of a job on part of my frame and the POR doesn’t have anything to stick to. If you have any rust, just knock the loose stuff off with a wire brush and wipe it down.Looks better that my frame does, as we speak. Just gathering ideas for good ways to cleanup without breaking the bank.
Advice/warning:: wear some exam type gloves and a long sleeve that you don’t care if it’s ruined. It will NOT wipe off. Paint thinner , mineral spirits, acetone or gasoline will not take it off of skin and it will not wash out of clothes. If you’re using a brush, get cheap brushes and throw away after each session. I found out after the first can was opened that you can not get the lid back on tight enough to keep it from developing a hard skim on the surface. If you want to preserve the remaining paint until later without it ruining, take a plastic bag and put on the can and THEN put the lid on and secure it. I worked out of the second can for 3 weeks doing that method.
It is a PITA, but after the POR dries, scuff it a little with 150 grit paper and wipe it down and then top coat it with gloss enamel. Won’t be a 3’ job, but it will look pretty too and clean up easier.
Sorry it was this was so wordy.
Randy
Put the hood back on today.... after my buddy spilt some paint on it.

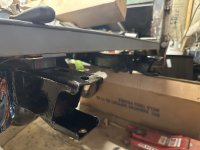
Replaced the friction/pressure plate, reinstalled tranny and transfer case… now welding up family cage onto the San Felipe roll bar.
Attachments
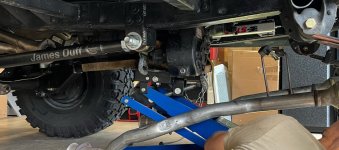

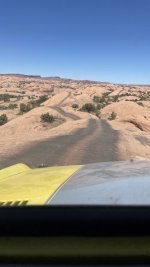
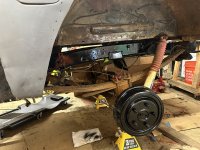
Not my bronco this time, but did some work for a neighbor. Did a custom heim y link steering with 3/4 rod ends and 1.5x.250 wall DOM, switched to tie rod over, added a riser, did away with the drop arm and track bar bracket, and dropped from 5.5 springs to 3.5 springs. Drives 100% better!


Here is what we started with, massive bump steering and insane death wobble.

Here is what we started with, massive bump steering and insane death wobble.
fluffybunny
Newbie
- Joined
- Oct 28, 2015
- Messages
- 212
From Summit Racing:What’s your source for that? Got a link?
Alternator SUM-810308 (I loosened the housing bolts and rotated counter-clockwise to put connections at top rather than next to the block)
Painless backfeed diode PRF-30720 (instructions are in the box showing how to install it)
Charge wire PWM-1-582
Alternator pigtail TFF-7520A
From O'Reilly Auto:
Alternator belt 7430/15430
Mr. Gasket Universal Alt bracket MRG 9851 (I cut it in half between the 2 mounting holes and also reamed the inside slide to fit the 9/16 alternator bolt)
Total cost was $193. The Painless Performance wire harness installation book shows mostly how to install it but does not cover the diode. We first put this mod on my brother-in-laws Bronco. It would start fine but would not die when you turned the key off. A call to Painless resulted in them telling us that the backfeed diode was needed. That should be covered in the original instructions in my opinion.
Where did you find that?Installed Solo Motosports latch. No more creaking or popping open like the old bent one.
View attachment 926204
https://solomotorsports.com/pc/parts/ford-parts/exterior/Where did you find that?
Randy, great insight. Thank you for the information - I'll certainly keep this in mind!While POR 15 isn’t cheap, it does a good job sealing a frame that has some rusting. Don’t make my mistake and clean the metal to a bright finish. I did too good of a job on part of my frame and the POR doesn’t have anything to stick to. If you have any rust, just knock the loose stuff off with a wire brush and wipe it down.
Advice/warning:: wear some exam type gloves and a long sleeve that you don’t care if it’s ruined. It will NOT wipe off. Paint thinner , mineral spirits, acetone or gasoline will not take it off of skin and it will not wash out of clothes. If you’re using a brush, get cheap brushes and throw away after each session. I found out after the first can was opened that you can not get the lid back on tight enough to keep it from developing a hard skim on the surface. If you want to preserve the remaining paint until later without it ruining, take a plastic bag and put on the can and THEN put the lid on and secure it. I worked out of the second can for 3 weeks doing that method.
It is a PITA, but after the POR dries, scuff it a little with 150 grit paper and wipe it down and then top coat it with gloss enamel. Won’t be a 3’ job, but it will look pretty too and clean up easier.
Sorry it was this was so wordy.
Randy
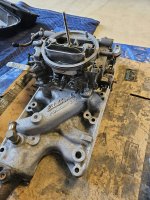
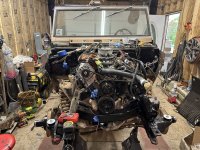
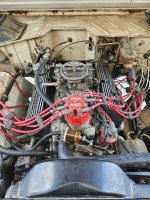
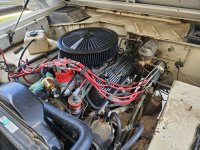
Got the thermostat housing, intake manifold, carb, new valve covers, distributor, and new air cleaner installed. I'll need to replace the lower radiator hose and refill the cooling system later this weekend.
It all went smoothly, but, if I'm honest, I'm worried I didn't lay a thick enough bead of RTV at the front and rear of the valley, so fingers crossed
It all went smoothly, but, if I'm honest, I'm worried I didn't lay a thick enough bead of RTV at the front and rear of the valley, so fingers crossed
Attachments

Similar threads
- Replies
- 38
- Views
- 6K
- Replies
- 23
- Views
- 4K
- Replies
- 31
- Views
- 2K
- Replies
- 5
- Views
- 722