• Welcome to ClassicBroncos! - You are currently viewing the forums as a GUEST. To take advantage of all the site features, please take a moment to register. It's fast, simple and absolutely free. So please join our community today!
    If you have problems registering or can't log into your account, please contact Admin.

Whelp.. Squeal turned into engine torn apart

DirtDonk

Contributor
Bronco Guru
Joined
Nov 3, 2003
Messages
48,102
Interesting. Lifters can bleed down completely of course, but I think it would be unusual for that to create enough play that their rocker arm won't move even a little.
Maybe I'm wrong on that, and it can be enough. I've just never seen it.

Paul
 
OP
OP
G

guidoverduci

Sr. Member
Joined
Mar 8, 2012
Messages
719
Loc.
NorCal
Now... timing set is off and it’s hiting in the same spot. Results are the same. Before I tear off the heads, is that telling something new??
 

75MIKE

Sr. Member
Joined
Aug 22, 2001
Messages
955
Loc.
NE Washington
I would try a $20 borescope (Amazon) before I tore the heads off. I believe that there is something in one of the cylinders giving you grief.
 

DirtDonk

Contributor
Bronco Guru
Joined
Nov 3, 2003
Messages
48,102
Agree totally. But whether it is or is not in the cylinders, it's better to take a quick peek before dismantling perfectly good heads and gaskets.

And back to testing for interference with the valvetrain, since the covers are off might as well tap each valve with something (rubber mallet, small steel hammer for shock value, or even dead-blow hammer) to see if you can dislodge any that might be stuck further down in their bores.
Just in case basically. To make sure none are stuck down.

But I'm still leaning towards something in the cylinder itself.
Or still that errant bolt somewhere.

Did you ever say whether you had the transmission in neutral or not? An auto trans should not lock up the engine because of the torque converter of course, but just to rule out anything behind the engine, this would be a basic step to take I would think.

Paul
 
OP
OP
G

guidoverduci

Sr. Member
Joined
Mar 8, 2012
Messages
719
Loc.
NorCal
I’m going to order one of those for sure. I’m also gonna check harbor freight and Home Depot.

Transmission is manual and in neutral. I’ve got everything removed, I can’t image where else it could be hitting a bolt.

Something else I remembered... before I put the timing cover on, I was able to line up the dots correctly, for sure. They were in the correct 0 degree spot. I put everything back together and then decided to rotate it fully and check the balancer. That’s when I ran into current situation. With everything removed, I am no longer able to get the dots to align correctly. It stops right before the dots align. And if I reverse direction, it stops right before the dot on the cam sprocket hits 12 o’clock.

Am I looking for or listening for anything when I hit the valves with a mallet? Any particular spot?
 

DirtDonk

Contributor
Bronco Guru
Joined
Nov 3, 2003
Messages
48,102
With the engine crankshaft only able to turn once, your marks can't align except in one direction. The cam gear turns exactly half as fast as the crank, so a full crank rotation is only a half cam rotation.

You don't need to hit the valves/rockers very hard. I'm thinking just enough to see if any that are pushed in will pop back out. What MIKE said about checking springs too for sure. If you have a broken spring, you should be able to see it.
But if you can't see it, you for sure should see/hear/feel it when you tap/smack the top of the valve. It'll go down and not pop all the way back up because the spring can't do it.
And it should sound totally different from the others.

I just realized something from what you said previously. Because you can't turn the crankshaft around two times, you are not going to see all the valves do anything. That's because for only half the cycle, only half the valves are being actuated.
So while rotating the next time, count the number of valves that do something. If it's 8 our of the 16, then that could be perfectly normal for your condition.

Didn't someone just recently have a flywheel/flexplate bolt that was too long and causing this same issue?
Of course, in your case the engine was already running fine and giving no indication prior to this. Which would "seem" to rule that too-long bolt theory out completely. But at this point, what can we really rule out?
Not much yet...

Crossing fingers it's just some rust in the cylinder(s) you find with the scope.
And speaking of which... Have you sprayed any lubricants/rusticants in the cylinders lately? With the plugs still out, maybe a shot of some release lube (what's the name of that old stuff in the yellow cans? (edit: Liquid Wrench!)) might start to dissolve some rust and get you going again.

Worth a shot. He says, pun intended maybe...

Paul
 

pcf_mark

Bronco Guru
Joined
Jun 11, 2010
Messages
3,603
If it locks up right before the dots line up (TDC #1) then #6 valves should be moving start looking there. But none of this makes any sense if you did not touch the valve train.

As a last resort remove all the rocker nuts and let the valves full close. Rotate crank. Still stops it is something in a bore or something hitting external like balancer or flywheel. If it does not stop you know it is the valvetrain.
 

Crush

Contributor
Bronco Guru
Joined
May 30, 2007
Messages
3,463
Loc.
Greenbottom, WV
Have you buy chance replaced the clutch while doing this? If you changed the pressure plate from the three finger type to a diaphragm type then there are two casting bumps in the bell housing that need ground off in order for the new pressure platr to clear. Did this on Deanos bronco. Got it all put back together and it acted like it was locked up. Lol
 
OP
OP
G

guidoverduci

Sr. Member
Joined
Mar 8, 2012
Messages
719
Loc.
NorCal
Found it! After following all the suggestions, I discovered a tiny screw head in the #1 cylinder. I remember after I closed everything the first time, I had to sawzall this tiny screw. It must have made the almost impossible journey into the spark plug hole when I thought it had dropped to the ground and thought nothing of it. DOH!! It now rotates fully.

Now... Lots of things I need to understand before I button everything up. Should I be worried about possible issues that little screw created? I didn’t notice anything on the camera, but then again, I’m not exactly sure what I’d be looking for. Next, the timing chain is off, the rocker nuts are off, I tired to be very careful on keeping the chain on the current / correct position on the upper sprocket as I removed it. Can I just reinstall matching the dots with the position they were in before I moved it? I took a pic as it was just before TDC. The only isssue I see is that it could be 180 off because I don’t know which revolution the crank would be on, if that makes sense. What is the correct way to do this with everything off?

What are somethings I need to be careful of when putting all of this back (besides a screw in the spark plug hole lol). Some things I noticed as I began this journey...

There was a very slow drip, that I didn’t catch, of radiator fluid in the pan. Couldn’t be much. Will this be an issue?

After the intake was removed, there was a small pool of fluid (red in color) in one of the sealed cavities of the heads. Perhaps a mixture of oil and radiator fluid. Everything else was bone dry, but this was a good size pool. Concerns?

I now have to tighten the rocker bolts, is there a correct torque?

I’m sure I’ll have something else, but I just want to make sure this goes back correctly! Thanks for all the help!!
 

DirtDonk

Contributor
Bronco Guru
Joined
Nov 3, 2003
Messages
48,102
Found it!

Congrats (finally!)!
Good feeling. Strange occurence, but just goes to show...


Should I be worried about possible issues that little screw created?

Yes, but... If you did not see any scratches or gouges that the rings can catch on and be damaged, I don't see anything that would keep you from just putting it back together as is.
Maybe the others will have suggestions of what to look for.


Next, the timing chain is off, the rocker nuts are off, I tired to be very careful on keeping the chain on the current / correct position on the upper sprocket as I removed it. Can I just reinstall matching the dots with the position they were in before I moved it?

Yes. You simply need to line the marks back up the way they say to. With it all apart, you can rotate the crank and cam independently to get everything perfect again.

The only isssue I see is that it could be 180 off because I don’t know which revolution the crank would be on, if that makes sense. What is the correct way to do this with everything off?

You can't get anything 180 off if you line up the marks the way they should be. This is by definition correct. There are no two ways about it like there are with a distributor, because with a distributor you can't watch the timing marks on the gears. In the current condition of being apart, you can line them up and they will be correct.

There was a very slow drip, that I didn’t catch, of radiator fluid in the pan. Couldn’t be much. Will this be an issue?

Depends on where it's coming from. Find it and fix it.
If it's coming from something you have apart, this is the only "perfect time" to fix it.

After the intake was removed, there was a small pool of fluid (red in color) in one of the sealed cavities of the heads. Perhaps a mixture of oil and radiator fluid. Everything else was bone dry, but this was a good size pool. Concerns?

If it was an automatic trans you could have pulled tranny fluid from the vacuum modulator. But since it's not, it's hard to say what it was. Can you post up a pic of where it was?

I now have to tighten the rocker bolts, is there a correct torque?

Yes. Someone else will have to touch on that though. Depends on your setup.

Paul
 
OP
OP
G

guidoverduci

Sr. Member
Joined
Mar 8, 2012
Messages
719
Loc.
NorCal
Yes, but... If you did not see any scratches or gouges that the rings can catch on and be damaged, I don't see anything that would keep you from just putting it back together as is.
Maybe the others will have suggestions of what to look for.
After another look, there are some faint scratches. I didn’t see anything close that would be considered a gouge, but I was only using an inspection camera. At this point, I’m leaning towards just putting it back together.
Depends on where it's coming from. Find it and fix it.
If it's coming from something you have apart, this is the only "perfect time" to fix it.
It’s just residual dripping while everything is open. I was just wondering if its a problem if there’s a little in the pan or if it just burns off.
If it was an automatic trans you could have pulled tranny fluid from the vacuum modulator. But since it's not, it's hard to say what it was. Can you post up a pic of where it was?
Here’s a pic! There was more fluid in the cavity, but I dried some of it up.
 

Attachments

  • 9D781324-24FC-4485-AC4E-E16C5511C6BF.jpg
    9D781324-24FC-4485-AC4E-E16C5511C6BF.jpg
    108 KB · Views: 26

DirtDonk

Contributor
Bronco Guru
Joined
Nov 3, 2003
Messages
48,102
Looks like it's only oil that splashes up during running, OR happened to drip into there (with maybe a little coolant) during the teardown.

A little in the pan will burn off assuming your engine gets hot enough. But, after much work like this and the fact that even a tiny screw head found it's way into a spark plug hole, it's typically the best practice to change the oil after everything is buttoned back up.
That makes sure that the oil is clean of any possible contaminants or debris.

Paul
 

pcf_mark

Bronco Guru
Joined
Jun 11, 2010
Messages
3,603
That is crazy! Great that you found it. It did not make any sense what was going on.

Your valve train should be zero lash / positive stop - tighten all the nuts back up to 20 ft-lbs. Rotate the engine a few times just to keep tabs on it in case something weird happens.
 
OP
OP
G

guidoverduci

Sr. Member
Joined
Mar 8, 2012
Messages
719
Loc.
NorCal
I’m getting around to closing everything up and hooking all the hoses up. Just a couple questions for now...

1. How much coolant do I put in? Is it as simple as fill the radiator, let it run a bit, then check and add if needed? Any particular color or pre mix?

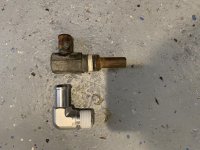
2. This elbow piece in the attached pic needed replacing, I had something lying around that fits, but it doesn’t have the extension into the intake... does it matter?
 

Attachments

  • D5571CB6-D367-4E64-9C73-B712FDCDA05D.jpg
    D5571CB6-D367-4E64-9C73-B712FDCDA05D.jpg
    115.3 KB · Views: 18

DirtDonk

Contributor
Bronco Guru
Joined
Nov 3, 2003
Messages
48,102
How much coolant do I put in?

None!
Use water only at this point. If there is a leak or any other surprises, you're not making a mess and losing money by draining it all out again.

Is it as simple as fill the radiator, let it run a bit, then check and add if needed?

Yes, that simple. At first anyway.
If you really want to make it 50/50 exactly, someone will have the capacity for you and you can figure out how to get it correct.

Any particular color or pre mix?

I do like pre-mix, but don't like paying the extra for it, and also don't mind having too much anti-freeze in at first. When it burps out eventually, which they almost always do at some point, then you just top off with water. Eventually you'll be at the recommended 50/50 mix.
I think Green is good. But anything that says "compatible with ALL types of anti-freeze chemistry" would work.
In fact, these days that's likely the safest route because there's always some bozo that wants to do you a favor by topping your Green-stuff off with Dex-Kill when you least expect it!

2. This elbow piece in the attached pic needed replacing, I had something lying around that fits, but it doesn’t have the extension into the intake... does it matter?

Yes, but is it critical? I'm not sure.
I have never actually read anything about additional siphoning effect, or what exactly it's doing down there at the bottom of the manifold surface that a simple fitting would not do.
But I'd like to hear if someone knows. The good news is that those parts are still available. Be nice to use what you have, but if the reasoning is sound enough, just get the correct one.

Good luck on this go round!

Paul
 
OP
OP
G

guidoverduci

Sr. Member
Joined
Mar 8, 2012
Messages
719
Loc.
NorCal
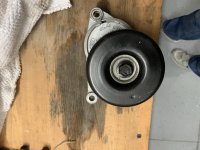
Can’t find anything that allows me to loosen the tensioner pulley and I’m goin crazy! There’s no hole, like all videos and google searches suggest. I’ve removed the whole pulley and tensioner and I see nothing...
 

Attachments

  • C9A432B1-5EA2-4EF9-9CCD-D32F1362CE5E.jpg
    C9A432B1-5EA2-4EF9-9CCD-D32F1362CE5E.jpg
    97.2 KB · Views: 17

sanndmann3

Bronco Guru
Joined
Jun 13, 2007
Messages
1,774
The tensioner is spring loaded. There isn't anything to adjust, it should should set the correct tension by itself provided that the belt length is correct
 

sanndmann3

Bronco Guru
Joined
Jun 13, 2007
Messages
1,774
If you put a 15 mm socket on the tensioner bolt it should rotate.i'm not sure how much torque it takes but probably 30 ft-lbs or more. Let me know if it's not cooperating.
 
Top