• Welcome to ClassicBroncos! - You are currently viewing the forums as a GUEST. To take advantage of all the site features, please take a moment to register. It's fast, simple and absolutely free. So please join our community today!
    If you have problems registering or can't log into your account, please contact Admin.

Whelp.. Squeal turned into engine torn apart

swmrdrn

Jr. Member
Joined
Apr 18, 2017
Messages
121
Thanks. It looks good! I’m just worried I’d need something else to make it fit with a late 80s 351w. I’m leaning towards damper dudes since it’s the same cost, but yours looks sweet!

Look at it this way, the combination that I used yields the same pulley location as the one piece explorer damper/pulley. Any sort of spacer would change the location relative to the explorer part. If you needed a spacer with this combination then explorer part would also have a problem.
 
OP
OP
G

guidoverduci

Sr. Member
Joined
Mar 8, 2012
Messages
719
Loc.
NorCal
Look at it this way, the combination that I used yields the same pulley location as the one piece explorer damper/pulley. Any sort of spacer would change the location relative to the explorer part. If you needed a spacer with this combination then explorer part would also have a problem.

Well I’m hoping for the same results. I’ve ordered both the damper and the pulley from WH. We’ll see! Here’s the spacer the website was referring to if anyone’s curious..

http://professional-products.com/sb-ford-spacer-for-80000-90000-series-95-thick
 

swmrdrn

Jr. Member
Joined
Apr 18, 2017
Messages
121
Well I’m hoping for the same results. I’ve ordered both the damper and the pulley from WH. We’ll see! Here’s the spacer the website was referring to if anyone’s curious..

http://professional-products.com/sb-ford-spacer-for-80000-90000-series-95-thick

That is interesting, I know that there is a longer water pump and maybe there was some sort of longer damper that was needed. You wouldn’t want a thinker/longer damper with the very short explorer front dress. I think you will be fine.
 
OP
OP
G

guidoverduci

Sr. Member
Joined
Mar 8, 2012
Messages
719
Loc.
NorCal
Ok fellas, i’ve got just about all the parts to tackle this tomorrow... just looking for some last minute tips and a few questions..

Timing chain.. i’ve got the markings matched up crank at 12 o’clock cam at 6, they are a couple circles. The damper slides on and the timing pointer should be installed and line up to zero, correct? When it comes time to drop in the distributor, how is this done? The PO marked both the intake and the distributor where it was lined up before i pulled it, should i just place the the same?

As far as gaskets go, i’ve got the recommended fel pro kit, is there any spray adhesive / rtv / tube goop recommended?

Any “don’t forget to”... Or “make sure..”. type stuff? I’m looking to get the timing cover, balancer / pulley, and water pump installed. Thanks
 
OP
OP
G

guidoverduci

Sr. Member
Joined
Mar 8, 2012
Messages
719
Loc.
NorCal
Didn’t make it too far before first snag... it doesn’t look like the explorer timing cover is deep enough for my cam.. is this a possibility or am I missing something?
 

Attachments

  • 39DE8A23-AA8F-4174-A4BD-E9C0648F7A3D.jpg
    39DE8A23-AA8F-4174-A4BD-E9C0648F7A3D.jpg
    108.5 KB · Views: 60
  • 099455E6-2658-4D5C-AD8C-8370E9916BEE.jpg
    099455E6-2658-4D5C-AD8C-8370E9916BEE.jpg
    123.2 KB · Views: 49

75MIKE

Sr. Member
Joined
Aug 22, 2001
Messages
955
Loc.
NE Washington
I believe your mechanical fuel pump eccentric has to come off the end of the camshaft. No need for it with the electric fuel pump.
 
OP
OP
G

guidoverduci

Sr. Member
Joined
Mar 8, 2012
Messages
719
Loc.
NorCal
Ahh! You are correct.. I did read that. I will admit though, I did not know what that was, but got it now. Thanks!
 
OP
OP
G

guidoverduci

Sr. Member
Joined
Mar 8, 2012
Messages
719
Loc.
NorCal
I had already put some rtv gasket goo on as you seen in the pic, and then decided to stop. I put the rtv on the cover and the block. The timing cover had a bead and a gasket as well. Now that everything is dried, Can I just put some more on the block? Or do I need to scrape it all off and do it again?
 

DirtDonk

Contributor
Bronco Guru
Joined
Nov 3, 2003
Messages
47,821
RTV? 24 hours? Clean it off.
Is the gasket stuck to one of the surfaces? If so I'd say that can stay if it's flat up against it's surface. If it's sitting on a thick, now dry bead of silicone though, remove it as well.
This is not important while the stuff is still tacky, as it will squeeze down. But once it's dried up, I'd say you need to start over. Not that it "can't" work by just adding some new junk to it, but you are the one that will have to pull it all off and re-do it if it does leak.
And I know that I sure would not want to be doing it twice!

Test fit, test fit, test fit, when it comes to swapped stuff.
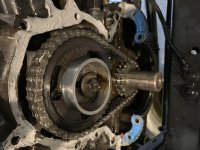
Of course, the rest of the stuff is pretty much going to fit the cover, because it was made for it. The only things that were not meant for each other originally are the block and cover. So even after you remove the pump eccentric and perhaps get the correct bolt (maybe the old one is too long now?) trial fit the cover again before applying sealer again.
Proper torque of the cam bolt is important, and I like to use thread locker. Not sure if it's required or called up in the instructions, but lots of members will know that as they've done it more recently than me and can let us know if the extra step is needed.

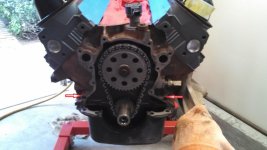
With alignment and test-fitting in mind, and unless you still have the alignment dowels in the front of the block(?) I would leave all the bolts just barely snug/loose and then fit the damper up as soon as possible after, then snug down (not full torque yet) all the bolts you can get to.
As there are probably at least one or two that you can't really access with the damper on, you then remove the damper again to access all bolts and torque them down to spec.
This added hassle is to make sure that the cover and seal are centered on the damper shaft. If you have the dowels this is not necessary. But without them, you run the risk of a leaky front seal.

Lubricating the crankshaft snout and the outer surface of the damper not only help ease it into the seal, but also make it easier to remove if necessary.
You do not need to install the damper all the way. Just far enough to be forcing the seal and front cover to center themselves.
Again, if you have alignment dowels in the block, all that extra crap isn't really needed.
But I wanted to mention it just in case. Maybe others have better ways of doing it.

Good luck.

Paul
 

904Bronco

Contributor
Bronco Guru
Joined
Sep 28, 2004
Messages
5,787
Loc.
San Martin, CA
Didn’t make it too far before first snag... it doesn’t look like the explorer timing cover is deep enough for my cam.. is this a possibility or am I missing something?

Way too much sealer... Clean up (remove existing) and start fresh. New gasket.

All you need is just a "little" around the water passages and at the back and front corners where the timing cover meets the block and the pan.

As Paul said a test fit before gasket and sealer, maybe
 

sanndmann3

Bronco Guru
Joined
Jun 13, 2007
Messages
1,774
Sorry I missed seeing this thread until today but it looks like you have been getting real good advice. When you bolt up the timing cover/waterpump make sure you use anti-seize on both the threads and the unthreaded portion of the bolts, especially the 3 1/4" bolts at the water outlet/inlet. I can't tell you how many I have snapped in the junkyard. :(
 
OP
OP
G

guidoverduci

Sr. Member
Joined
Mar 8, 2012
Messages
719
Loc.
NorCal
Way too much sealer... Clean up (remove existing) and start fresh. New gasket.

All you need is just a "little" around the water passages and at the back and front corners where the timing cover meets the block and the pan.

As Paul said a test fit before gasket and sealer, maybe


Been away for a couple weeks, but I’m looking to get back to this over the next couple days. Any advice on gasket or RTV install on timing cover / water pump? I’ve got the gasket from the felpro kit. I’ve got some permetex right stuff lying around. You’re saying I should be good with using both gasket and a bead around water passages, is that both sides of timing cover? Is the permetex stuff good for that?
 

904Bronco

Contributor
Bronco Guru
Joined
Sep 28, 2004
Messages
5,787
Loc.
San Martin, CA
Been away for a couple weeks, but I’m looking to get back to this over the next couple days. Any advice on gasket or RTV install on timing cover / water pump? I’ve got the gasket from the felpro kit. I’ve got some permetex right stuff lying around. You’re saying I should be good with using both gasket and a bead around water passages, is that both sides of timing cover? Is the permetex stuff good for that?

Contrary to what others may state... I am a minimalist when it comes to sealer on the timing cover/water pump because you have a gasket to do the sealing.
People use waayy too much sealer. If you have irregularities in the surfaces then sealer has a use or if your automotive product was designed not to use a gasket.

Right stuff - great product. Use sparingly, it spreads out under compression.

Test fit the cover to the block without sealer/gasket. Have you loosened the pan bolts enough so that you can get the cover on over the alignment dowels?

No sealer on the water pump gasket, unless you have surface irregularities.

If I have a need to hold a gasket in place, I would use a couple of dabs of 3M weatherstrip adhesive in 2-3 places and wait until it sets up.

Timing cover - a light spreading around the water passage holes on the block, same on the gasket to the cover. A small bead down at the bottom corners where the cover contacts the block down at the oil pan. Depending on the condition of the silicon oil pan gasket you have, you might put a light coat on it as well.

Start all TC bolts before tightening. Tighten all by hand. Now install the water pump with the long bolts. Then using a rim star pattern, move around while you tighten the cover bolts so things are evenly torqued. Then tighten the pan bolts you previously installed or loosened.
 
OP
OP
G

guidoverduci

Sr. Member
Joined
Mar 8, 2012
Messages
719
Loc.
NorCal
Test fit the cover to the block without sealer/gasket. Have you loosened the pan bolts enough so that you can get the cover on over the alignment dowels?

I didn’t notice any dowels? The pan was not loosened at all. I’ve got everything on and I don’t recall any issues.

For the most part, I’d say I did it exactly as you described. I did forget to put some lube in the front seal but I’m hoping I can get away with that.

I’m trying to take my time, just got a weird feeling I’ll be pulling stuff out again to fix some bonehead mistake lol
 

bronconut73

Bronco Guru
Joined
Aug 7, 2012
Messages
9,916
Most common mistake when putting on the timing cover is not loosening up the oil pan a little bit then when you try to push the timing cover on you push that gasket between the timing cover in the oil pan into the oil pan so it doesn't do its job of Sealing. But if you can get under there with a flashlight and look you should be able to see the gasket between the timing chain cover and the oil pump and if you can see it and you applied a little bit of RTV in that area then you will probably be fine. So try to get your head in there may be a mirror and a flashlight and see if you can see the gasket in that radius between the timing chain cover and the oil pan. If you didn't shove that gasket in and you got a little bit of RTV in the funky spots at the corners you're probably going to be fine
 
OP
OP
G

guidoverduci

Sr. Member
Joined
Mar 8, 2012
Messages
719
Loc.
NorCal
Got it. I took a peak and the gasket looks like it’s still there.

Got the harmonic balancer installed and both brackets with accessories. I have to relocate both grounds, battery to block and frame to block, because they were in the heads where the brackets went. Any recommended spots?

And what’s the best way to torque the crank bolt down without turning the engine??
 

sanndmann3

Bronco Guru
Joined
Jun 13, 2007
Messages
1,774
There is a couple holes drilled in the o.d. of the harmonic (for balance). In the junk yards, I take a large allen key and but it in the hole and then rotate the harmonic until the allen wrench contacts the waterpump, preventing further rotation.

you could also access the flex plate or flywheel and wedge a screw driver into the teeth or put a wrench on the nuts that bolt up the torque converter...

Couple ways to do it.
 

904Bronco

Contributor
Bronco Guru
Joined
Sep 28, 2004
Messages
5,787
Loc.
San Martin, CA
Alignment Dowels would have been here... See Picture.

Bolt would have passed through them.

Early motors do not have them, non roller.

Congrats on getting it together! We all started where you are, and some of us, including myself, Have done things twice.:eek:
 

Attachments

  • Alignment dowels.jpg
    Alignment dowels.jpg
    58.7 KB · Views: 25
OP
OP
G

guidoverduci

Sr. Member
Joined
Mar 8, 2012
Messages
719
Loc.
NorCal
Ahh, gotcha. Yes I had 1 dowel on the passenger side but that’s it. Everything kind of just slid on which is why I feel like I’m missing something!

Now on to the distributor and alternator install eek. Before I pulled the distributor, the PO had an alignment mark. Do I just stab it in and match the marks again?
 

DirtDonk

Contributor
Bronco Guru
Joined
Nov 3, 2003
Messages
47,821
...Before I pulled the distributor, the PO had an alignment mark. Do I just stab it in and match the marks again?

Depends. Was it running fine? Did the marks indicate anything specific that you can tell? Are they on the distributor housing and engine block? Or are they on the distributor housing and rotor?

Likely yes you can start there, but you still really have to do it for yourself. They may have made the marks based on where the engine sat at the moment, for a quick removal and install. If that's the case, then the marks have no basis in repetitive results because you don't know if they were marked for an engine at TDC, or just wherever it happened to sit.

With all the work you've done, you did verify that the engine is now sitting at it's TDC mark for #1 cylinder, right? I think we discussed that anyway.
If it's at TDC on the compression stroke, then you can put the distributor in the way it fits with the body (match the PO's old alignment marks if it's on the block) but be sure to put the rotor where it's supposed to go, facing the point on the cap that the #1 plug wire resides.

Remember that the gears are beveled so your rotor will turn as the distributor slides home. The trick is matching the hex shape of the pump shaft to the hex opening in the distributor shaft, AND match the gear teeth to each other, ALL while matching the rotor pointing in the right direction.
Complicated to write and read, but easy to understand once you'd done it a time or two.

Paul
 
Top