






Community
Buy / Sell



Bronco Tech
Fuel Tank Access Plate
3 Arm Wiper Setup
Fix Motor Mount
Roll Cage Braces
Throttle Body 65mm
Wheel Alignment
Heat Riser Replacement
Vent Window Repair
Center Console Mount
Straighten Bumper
Ford 6R80 6 spd
More Tech...
3 Arm Wiper Setup
Fix Motor Mount
Roll Cage Braces
Throttle Body 65mm
Wheel Alignment
Heat Riser Replacement
Vent Window Repair
Center Console Mount
Straighten Bumper
Ford 6R80 6 spd
More Tech...

-
Welcome to ClassicBroncos! - You are currently viewing the forums as a GUEST. To take advantage of all the site features, please take a moment to register. It's fast, simple and absolutely free. So please join our community today!If you have problems registering or can't log into your account, please contact Admin.
Articles
Navigation
Latest comments
-
 Fuel Tank Access Plate for the Early BroncoHey man, this is fantastic work. I just wanna throw a little tip form my experience of working on and modifying them metal bodies. Go to your...
-
Early Bronco Ignition Switch RemovalIf you're drilling it out, do you drill the whole cylinder or just enough to still use the pinhole?
-

-
Ford 6r80 6 speed automatic trans into a Bronco behind any SBF engineThanks for the kind words!
 Here is a pic of the crank hub. This should give you an idea of what it looks like. Original one. Looks a little...
-
Explorer 5.0 Serpentine Accessory Drive Belt ConversionAs an alternative to extending the fan shroud, I had these suckers made. I've done this swap in an F-100 too so I have both 2" and 3". Fan Clutch...

Tech article by Mike Dodd (md_lucky_13)
This tech article is intended as advice only, and should not be used in substitution of any correct manual, instructions, or specifications. There is potential for loss of property, injury, or even death if done incorrectly. If you are uncomfortable...

Tech article by Howard Eglett (BwoncoHowie)
The purpose of this article is to help those who seek to upgrade their alternator to the large housing Motorcraft 1G version. The information covered here will only pertain to the mounting process and will hopefully give an idea of what materials...

Tech article by Todd Henderson (74bronc)
If you're like me, the idea of religious 3,000 mile oil changes has been crammed into your being ever since you began learning about cars. This philosophy is undoubtedly a result of decades of 3,000 mile oil/filter changes and the "Quick Change" oil...

Tech article by John Edgecomb (edge4)
Click here for the parts list.
One of the most important elements of any Early Bronco EFI conversion is the fuel system. Due to the high-pressure requirements of the fuel rails and injectors, the stock pump and fuel lines are completely inadequate. The...

Tech article by Richard Burris (ricks77eb)
Adapted from a post by Craig Kepner. Photos used with permission.
I guess you could call this a Junkyard Tig Welder. The idea is you can mount a regular Ford 130 amp 3G style alternator on to your air compressor (or similar motor) so that you can use...

Tech article by Lars Pedersen (Lars)
When I bought my Centech harness two years ago, I discovered that they supplied a wiper switch that was completely different than the one in my Bronco. Besides being different, it didn't interchange mechanically or electrically with the stock switch. It...

Tech article by Gilbert Leonard (bert)
The purpose of this article is to help provide a little background information to troubleshoot most basic electrical problems. The information contained is from personal experience in the automotive field and is not to be understood as absolute or the only...

Quick and simple article showing the steps needed to remove the axle shafts from a Ford 9" rear differential.
1. Jack up vehicle and place sturdy jack stands under axle.
If removing third member, Remove and secure driveshaft,
Remove wheels and brake drums.
2. Remove 4 retainer nuts located...

Tech article by Honorio Madriaga (madgyver)
Tools needed
A flat surface
Masking tape
4 feet of string
Chalk (for marking)
Hydraulic jack with stands (if needed)
Simple five steps
Park your rig on a flat surface.
Tape one end of the string to the bottom (6 o’clock) of the rear drive shaft...
Tech article by Clay McGuill (eBronc)
You want traction? Get locked. Both wheels locked together on the same axle, all four wheels locked to the transfer case = maximum traction. No wheel slip, no spin. Just relentless...

Tech article by Merle Howard (Howiebilt)
The first thing you have to do is get some help. You already know that you will have to cut your front axle housing in half and the darned thing weighs more than most mortals can lift by themselves. I have chosen to use a band saw, to do the deed, since...

Tech article by Jason Rodgers (Gummi Bear)
No fancy tools necessary, no expensive stuff either...Pick up your favorite drink in a plastic bottle, a length (about 3') of 3/16" vinyl tubing, a 1/4" drill bit, the tiniest drill bit you have (I had a 1/16"), and some super glue {see Picture 1}...

Tech article by TOFIC (The Old Fart in Canada)
Some of you have asked about the rear disc brakes for your Bronco's. Below is a summation of about 5 years worth of research and experimentation with 2 totally different rear disc brake systems, both of the original FORD equipment on their...

Tech article by Tim Bowsher (Broncobowsher)
One of the hardest parts of installing the Chevy brake conversion is routing the brake lines. Trying to get the hose to route in a way that doesn't bind or get caught up in moving parts can be a real pain. After a visit to Randy at Driven Auto parts I...

Tech article by Jesse Bauman bronko69er
After multiple inquiries on how I did this, I figured it was time to use all the pics I took and write a tech article. I'll preface the article with a short statement about the exact application, and what I started with.
I installed this set up on a 1969...

Tech article by TOFIC
Wandering the wild country one day, I stopped in a small town to acquire some fuel and liquid refreshment, and discovered the scrap metal dump just outside town. In amongst the derelict refrigerators and lawn mowers was a 1976 Mercury Grande Marquis Station Wagon. Ah Ha...

Product Review by Jon Hanna (Admin)
Recently I installed the "No Modify" Power Brake Kit from Tom's Bronco Parts and have been very happy with the results. In addition to being a nice kit, what really sold me was the fact that the booster design fits with no fender modification.
The kit was...
Tech article by 66horse
1. First cut your line.
2. Then I like to ream the ID of the tube with a punch or something to round out the ID of the tube.
3. Then i take a file and chamfer the edge of the tube 45* all around.
4. VERY IMPORTANT STEP ! Place your fitting on the tube. Yes I have...
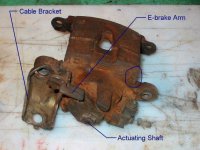
Tech article by Lars Pedersen (Lars)
The addition of rear disc brakes is a popular upgrade for early Broncos. Lots of creative people have accomplished this mod using components from Lincolns, Cadillacs, Ford Explorers and others. These days it's easier than ever due to the availability of...

Tech article by Ryan Flud
I searched high and low for a disc brake conversion kit for my ’73 Bronco. It seems virtually everybody sells the Chevy/Ford conversion, not to mention they charge about $800 +tax and shipping. I don’t mind using parts from other vehicles to make an upgrade or...