


Community
Buy / Sell


Bronco Tech
3 Arm Wiper Setup
Fix Motor Mount
Roll Cage Braces
Throttle Body 65mm
Wheel Alignment
Heat Riser Replacement
Vent Window Repair
Center Console Mount
Straighten Bumper
Ford 6R80 6 spd
More Tech...
Fix Motor Mount
Roll Cage Braces
Throttle Body 65mm
Wheel Alignment
Heat Riser Replacement
Vent Window Repair
Center Console Mount
Straighten Bumper
Ford 6R80 6 spd
More Tech...

-
Welcome to ClassicBroncos! - You are currently viewing the forums as a GUEST. To take advantage of all the site features, please take a moment to register. It's fast, simple and absolutely free. So please join our community today!If you have problems registering or can't log into your account, please contact Admin.
You are using an out of date browser. It may not display this or other websites correctly.
You should upgrade or use an alternative browser.
You should upgrade or use an alternative browser.
Dan Wheeler's 69 4R70W/Atlas Build Thread
- Thread starter DanWheeler
- Start date
OP
OP
DanWheeler
Bronco Guru
Coming along pretty good! Are you going to make the contact area between trans mount and crossmember flat for strength?
yeah... i was wondering about that. What's the worst that could happen if I left it as is?
any suggestions? i'd like to keep it as simple as possible and ideally it would be something that wouldn't leave the stock crossmember unusable.
could I just make some angled wedges?
The way I see it, there's no way that little mount is doing much of anything to prevent the drivetrain from rotating. If it were, seems like that would have made the whole thing beefier and wider.
So isn't it just holding the transmission up? The motor mounts should keep the whole thing from twisting.
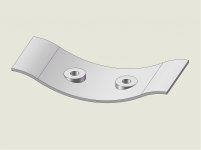
The most likely scenario I see happening is that side loading on the trans mount studs because of the angle causes them to break off.
I sketched an idea.
Get some round stock (I used 1", but it may not need to be that big).
Bore the holes you already made in the crossmember out to the OD of the round stock.
Cut a couple of sections of round stock so they are just long enough to gap the angled holes (I think you can see what I mean in my cross section drawing).
Bore holes in the sections big enough for the mount studs.
As an alternative, you may be able to find spacers or washers off the shelf that would do the same thing.
Put everything together as shown in your 7th & 8th pics.
Slip the spacers you made over the mount studs and use the nuts to hold them in place.
Tack weld the spacers into the holes. This should look about like the drawing I made.
Pull the crossmember off and finish welding.
That will give a good level support surface for the trans mount without a lot of work.
If you ever want to revert to something else it wouldn't be too hard to undo that.
Attachments

OP
OP
DanWheeler
Bronco Guru
The most likely scenario I see happening is that side loading on the trans mount studs because of the angle causes them to break off.
I sketched an idea.
Get some round stock (I used 1", but it may not need to be that big).
Bore the holes you already made in the crossmember out to the OD of the round stock.
Cut a couple of sections of round stock so they are just long enough to gap the angled holes (I think you can see what I mean in my cross section drawing).
Bore holes in the sections big enough for the mount studs.
As an alternative, you may be able to find spacers or washers off the shelf that would do the same thing.
Put everything together as shown in your 7th & 8th pics.
Slip the spacers you made over the mount studs and use the nuts to hold them in place.
Tack weld the spacers into the holes. This should look about like the drawing I made.
Pull the crossmember off and finish welding.
That will give a good level support surface for the trans mount without a lot of work.
If you ever want to revert to something else it wouldn't be too hard to undo that.
Thats it - i love it! great idea, thanks Lars.
Your idea left as is wouldn't interfere with stock usage of the crossmember so if I ever went back to stock or gave the crossmember to someone else it shouldn't need to be modified back to stock form.
Lars, that is a piece of art you got there!
Thanks- I'm only able to do it because of the ridiculously expensive software that my employer pays for, that let's me crank out stuff like that with a few of the proverbial mouse clicks

OP
OP
DanWheeler
Bronco Guru
got the engine straightened out (for those of you who were following my tweaked motor mount thread)

changed the mounts a bit to lower the crossmember
it's slightly too low now so I'll use some spacers or do something to bring it up 3/4" or so

it's a total boat anchor but thats about as high as it goes without causing an extremem driveshaft angle. I had it up an inch or so higher but the driveshaft was at about 16 degrees.


changed the mounts a bit to lower the crossmember
it's slightly too low now so I'll use some spacers or do something to bring it up 3/4" or so
it's a total boat anchor but thats about as high as it goes without causing an extremem driveshaft angle. I had it up an inch or so higher but the driveshaft was at about 16 degrees.
av8rds
MAhole!
mmmmm seems awfully low to me. My 4sp behind the longer OD(4l60e) tranny only sticks down abou 1.5" if I remember right???
OP
OP
DanWheeler
Bronco Guru
mmmmm seems awfully low to me. My 4sp behind the longer OD(4l60e) tranny only sticks down abou 1.5" if I remember right???
tranny sticks down 1.5", or transfer case? My transmission is well above the framerails.
what is your driveline angle?
Crappy iPhone pix, but maybe they help. Measured 3.5 inches from bottom of Atlas at the lowest point, to bottom of frame rail. NV4500 transmission, 2 speed Atlas, AA crossmember, lateral location of rear output is about 10.5" from inside of right frame rail.
Attachments


OP
OP
DanWheeler
Bronco Guru
Crappy iPhone pix, but maybe they help. Measured 3.5 inches from bottom of Atlas at the lowest point, to bottom of frame rail. NV4500 transmission, 2 speed Atlas, AA crossmember, lateral location of rear output is about 10.5" from inside of right frame rail.
thanks for the measurements, Lars. I'll compare that against mine tonight.
I believe I'm at 10.5" also to the right side inside frame rail so in theory i should be able to clock my atlast the same as yours but for some reason it doesn't want to go up as high.
It was a little better when i had the transmission about 1" or more higher up in the tunnel but then my driveline angle was so severe at around 17 degrees.
av8rds
MAhole!
tranny sticks down 1.5", or transfer case? My transmission is well above the framerails.
what is your driveline angle?
sorry that was unclear my 4sp Atlas...maybe it was 2.5" looking at my picture
Attachments

OP
OP
DanWheeler
Bronco Guru
called Tom Woods and they are saying that 16 degress really isn't much to be worried about on the highway so maybe I'll put it back up where it was.
I've got more tack welds on those mounts than I can count now
I've got more tack welds on those mounts than I can count now
Dan, just looking at your pics. So if you try to clock Atlas up further what is it hitting, frame, ebrake bracket, floorboard? On top of big hole in trans tunnel, I cut my floorboard slightly and ebrake bracket off to get Stak to clock up a little more. Also had to make another crossmember due to front yoke hitting it, but ultimately it was worth the extra effort because my case is approx 1 3/4" below frame and I feel that acceptable since radius arm mounts are approx same distance below frame. At some point I will add skid plate too.
See threads for pics. Again this is for completely different set-up than yours but maybe there are ideas to be gained.
http://classicbroncos.com/forums/showthread.php?t=137977&highlight=stak
http://classicbroncos.com/forums/showthread.php?t=137256&highlight=stak
See threads for pics. Again this is for completely different set-up than yours but maybe there are ideas to be gained.
http://classicbroncos.com/forums/showthread.php?t=137977&highlight=stak
http://classicbroncos.com/forums/showthread.php?t=137256&highlight=stak
6daze
Sr. Member
- Joined
- Feb 6, 2007
- Messages
- 798
I had similar troubles clocking my 2 speed Atlas behind the ZF. I still may shove the tranny over to the passenger side for more clearance.
I notched the "rib" that runs over the tranny hump. I also cut out part of the ebrake bracket.
The lowest point is 3 1/4" below the frame.
I notched the "rib" that runs over the tranny hump. I also cut out part of the ebrake bracket.
The lowest point is 3 1/4" below the frame.
OP
OP
DanWheeler
Bronco Guru
The most likely scenario I see happening is that side loading on the trans mount studs because of the angle causes them to break off.
I sketched an idea.
Get some round stock (I used 1", but it may not need to be that big).
Bore the holes you already made in the crossmember out to the OD of the round stock.
Cut a couple of sections of round stock so they are just long enough to gap the angled holes (I think you can see what I mean in my cross section drawing).
Bore holes in the sections big enough for the mount studs.
As an alternative, you may be able to find spacers or washers off the shelf that would do the same thing.
Put everything together as shown in your 7th & 8th pics.
Slip the spacers you made over the mount studs and use the nuts to hold them in place.
Tack weld the spacers into the holes. This should look about like the drawing I made.
Pull the crossmember off and finish welding.
That will give a good level support surface for the trans mount without a lot of work.
If you ever want to revert to something else it wouldn't be too hard to undo that.
well Lars, that as a great idea but I got lazy and just did this:

I think it should be fine. There's a piece of steel under the top one. I may do something underneath as well so the nuts and washers aren't at too much of an angle.
Still working on the height of the Atlas. It looks like I can't put it at the angle I'd like because the stock cross member is a little too low and hits the front output if I try to clock it up to far. I'll have to post some pics another day.
Dan, I had same problem when trying to clock higher, I even removed material from original crossmember but it still hit when I tried to clock StaK higher. I am figuring even though this is StaK and yours is Atlas that they are both boat anchors with similar dimensions and output shaft locations so perhaps this type of crossmember would help your build.
I ended up making this new crossmember and used part of old one for mounting and reference for correct height. Once I got height I looped off passenger side portion of crossmember.
OP
OP
DanWheeler
Bronco Guru
That looks like a sweet T/A in the background! Can you post some PICS of that also?
Thanks! It's sweet on the inside, a little sour on the outside. ;D


A serious Trans Am fan will recognize that last pic shows the wrong bird for the 79 year but I prefer the older bird decal over the 79. Lots to be done still.
well Lars, that as a great idea but I got lazy and just did this:
Laziness is just the external manifestation of an ingenious mind. I say, well done!
Similar threads
- Replies
- 0
- Views
- 1K
- Replies
- 6
- Views
- 1K
- Replies
- 95
- Views
- 13K
- Replies
- 46
- Views
- 9K