Will do. It's my first time trying to weld a cage together. I plan on picking up extra tube and scraps and really working out the techniques. Once you understand the angles on the cage and where to grind it's just a matter of not taking too much material off at once, and taking it off evenly from both sides of pre-bent tubes. The more hands the better to get it started.
Side note, I'm not kidding when I said it kicked my ass for a couple days of actual work.
One thing that definitely helped with squaring it all up was using the inner bars to help align everything. You could do the same with anything really. I believe the measurement by TBP was 27 1/2" over all width between front and rear hoop but that will obviously vary depending on how much material you remove.
What worked for me was finding center on the front and rear bars, measuring equal distance out each side ( I think I did 8 inches each direction, so 16" spread between the bars, then securing the inner bars in place in place with straps. Those little magnet semi-triangle thingy's come in handy here. Then all you need to do is try and square the legs up on the bronco floor. This helped keep everything up in the air to while I didn't have anybody else around to help hold things in place. I squared the legs by measuing back of the fender well, and away from the rear side panel.
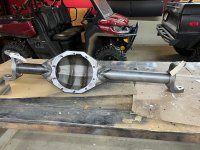
Below is a shot of that set up. Nothing there is welded in. I was still trying to get the right distance, but you can see the process.
View attachment 879394


")
 Luckily I have the perfect height step stool to walk up in to the bronco suit was like being on the stair master all weekend.