


Community
Message Forum
Photo Gallery
Event Calendar
Book Reviews
Bronco Wallpaper
Bronco FAQ
Link Back to CB!
Photo Gallery
Event Calendar
Book Reviews
Bronco Wallpaper
Bronco FAQ
Link Back to CB!
Buy / Sell


Bronco Tech
3 Arm Wiper Setup
Fix Motor Mount
Roll Cage Braces
Throttle Body 65mm
Wheel Alignment
Heat Riser Replacement
Vent Window Repair
Center Console Mount
Straighten Bumper
Ford 6R80 6 spd
More Tech...
Fix Motor Mount
Roll Cage Braces
Throttle Body 65mm
Wheel Alignment
Heat Riser Replacement
Vent Window Repair
Center Console Mount
Straighten Bumper
Ford 6R80 6 spd
More Tech...

Install the app
-
Welcome to ClassicBroncos! - You are currently viewing the forums as a GUEST. To take advantage of all the site features, please take a moment to register. It's fast, simple and absolutely free. So please join our community today!If you have problems registering or can't log into your account, please contact Admin.
You are using an out of date browser. It may not display this or other websites correctly.
You should upgrade or use an alternative browser.
You should upgrade or use an alternative browser.
Engine Swap: Cummins R2.8
- Thread starter Digger556
- Start date

OP
OP
Digger556
Sr. Member
- Joined
- Aug 8, 2013
- Messages
- 793
Nice model!
Did you build this from scratch? Does it have suspension and frame components?
Hinmaton
Sent from my iPhone using Tapatalk
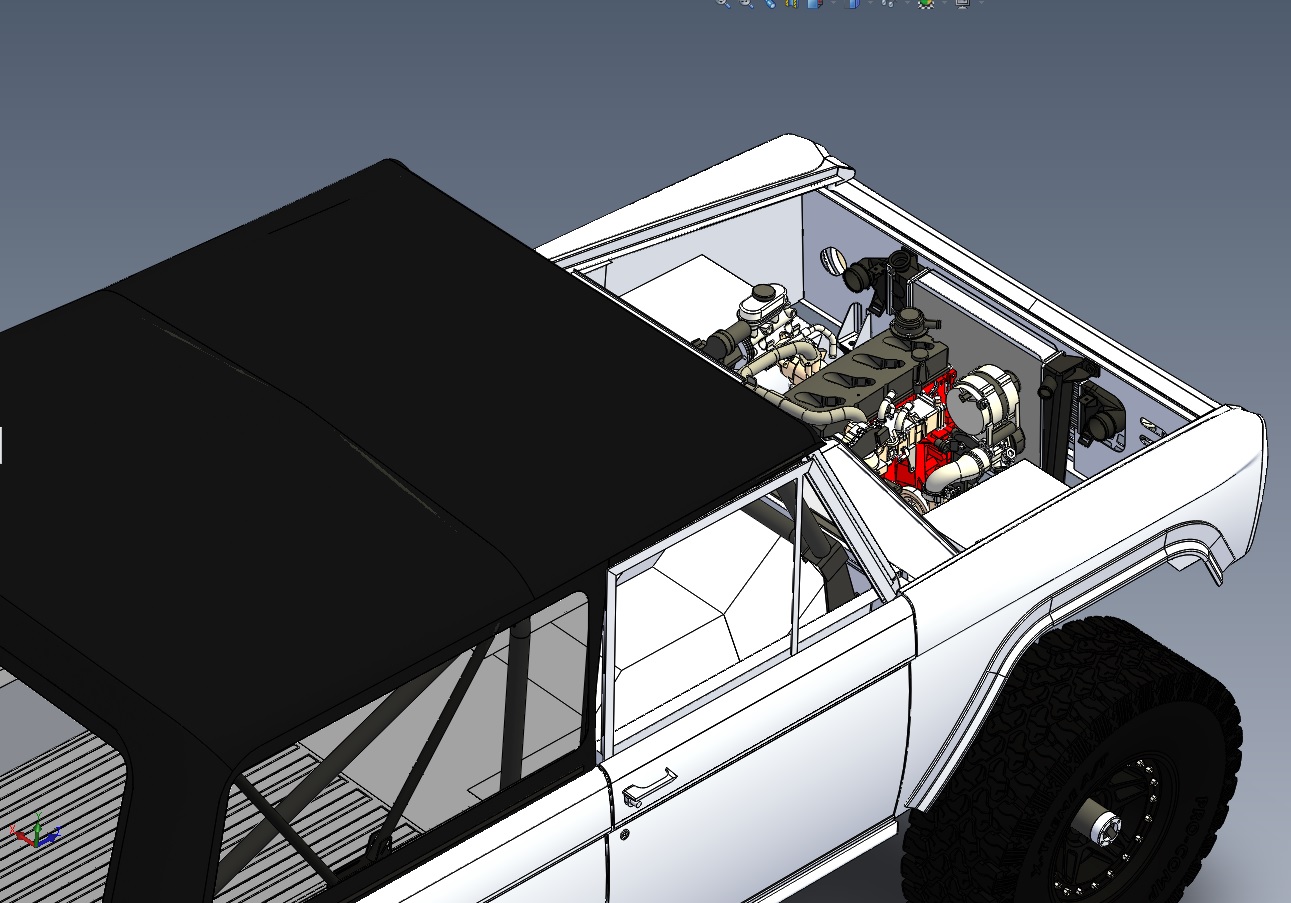
Thank you! Yes, it was built from scratch. I started modelling the frame and a few body panels, then things snow-balled from there. Probably have around 500-700 hrs into it so far. It has been immensely helpful for designing the suspension, cage, brackets, etc.
It started with this:

and ended up around here:

Since this picture, I've added most of the drivetrain and details here and there. The suspension is 70% finished. The only part I didn't do myself was the engine. I have a full blown model and a simplified version I'm building from scratch. I've built some parts over the years that would have been difficult without the CAD software. It's been nice to mock up an idea and test fit it or stress test a component on the computer before building it.

OP
OP
Digger556
Sr. Member
- Joined
- Aug 8, 2013
- Messages
- 793
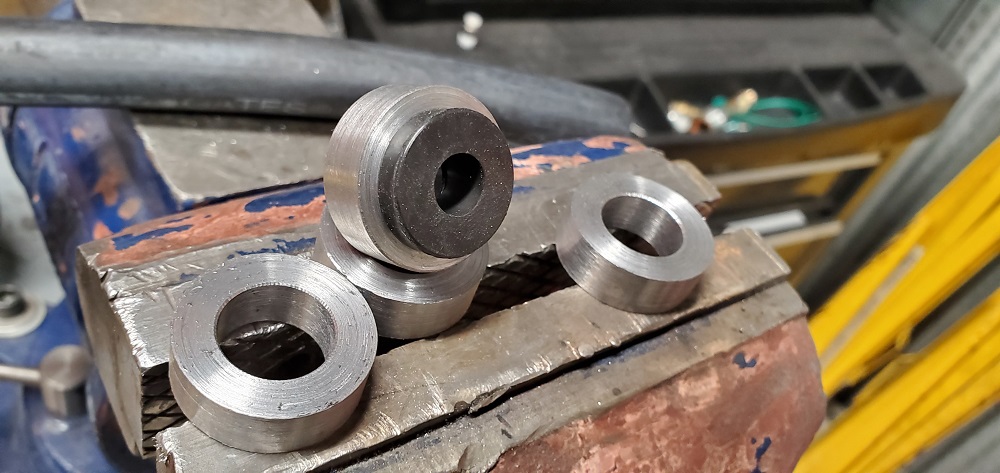
I ordered some grommets for the intercooler and got to designing brackets. After 2 nights and some test machining, it was apparent the grommets were not going to work. Here was the original grommet mockup.

It only had a 1/4" thru hole and I tried securing it with a 10-32 screw. I would have to machine a double-end stud, like a shock stud to make this work. The wall thickness holding the screw would have been very thin. ~0.060"
I spent a few nights cruising McMaster and found a better tophat style grommet that not only provided room for a larger bolt, but more cushioning rubber as well. Heading back to the computer, I designed up a new bracket system and had the plate cut at work on the laser.
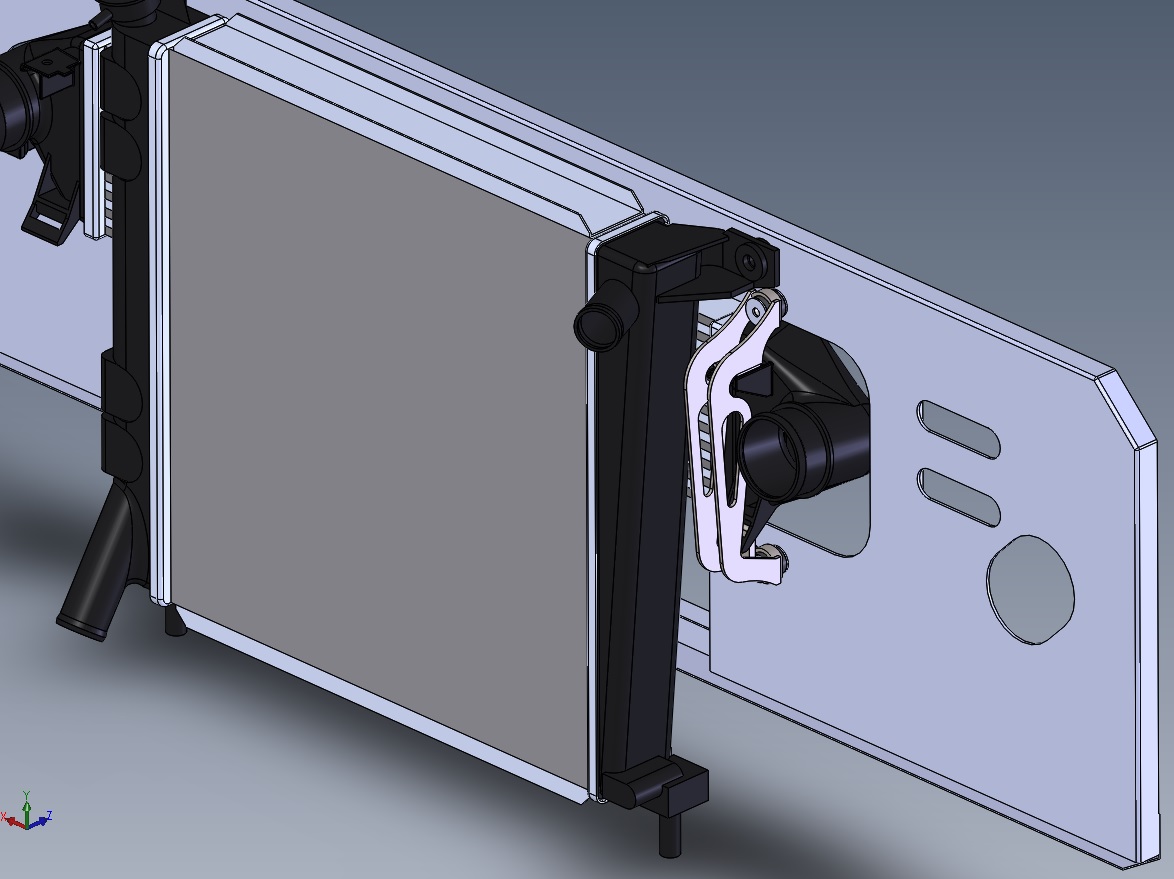

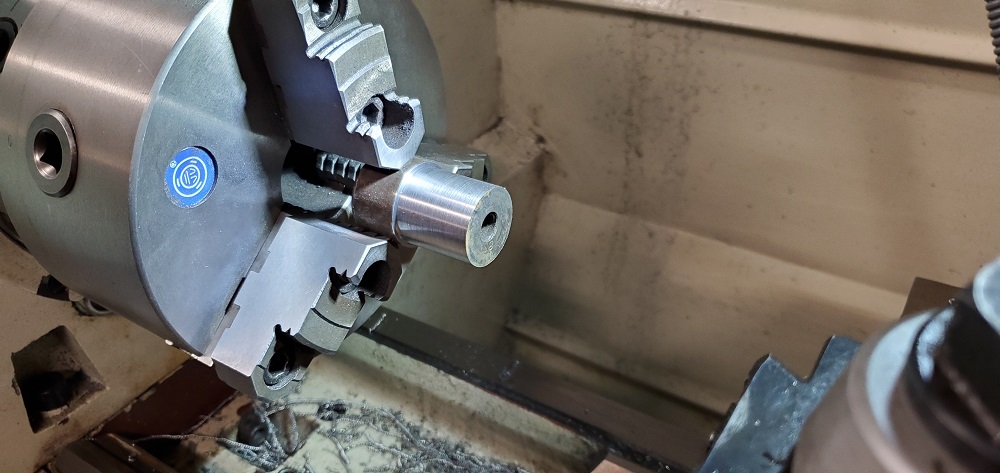
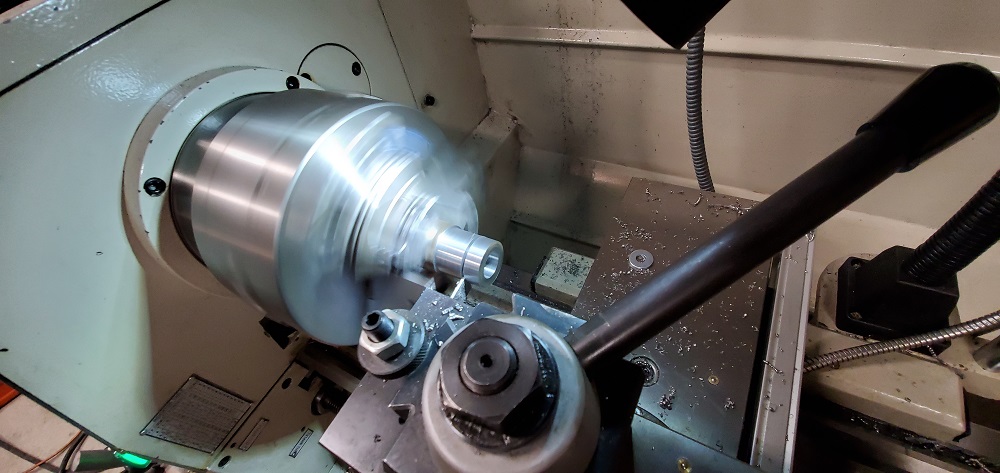
The mounting bosses were turned out on the lathe to get a precise ID for the grommets and flats were machined in using the mill later.
It only had a 1/4" thru hole and I tried securing it with a 10-32 screw. I would have to machine a double-end stud, like a shock stud to make this work. The wall thickness holding the screw would have been very thin. ~0.060"
I spent a few nights cruising McMaster and found a better tophat style grommet that not only provided room for a larger bolt, but more cushioning rubber as well. Heading back to the computer, I designed up a new bracket system and had the plate cut at work on the laser.
The mounting bosses were turned out on the lathe to get a precise ID for the grommets and flats were machined in using the mill later.
OP
OP
Digger556
Sr. Member
- Joined
- Aug 8, 2013
- Messages
- 793
A little bit of welding and throw in some crush sleeves and the mounts were ready to fitup. Here you get a good view of the way the OEM mounts work.
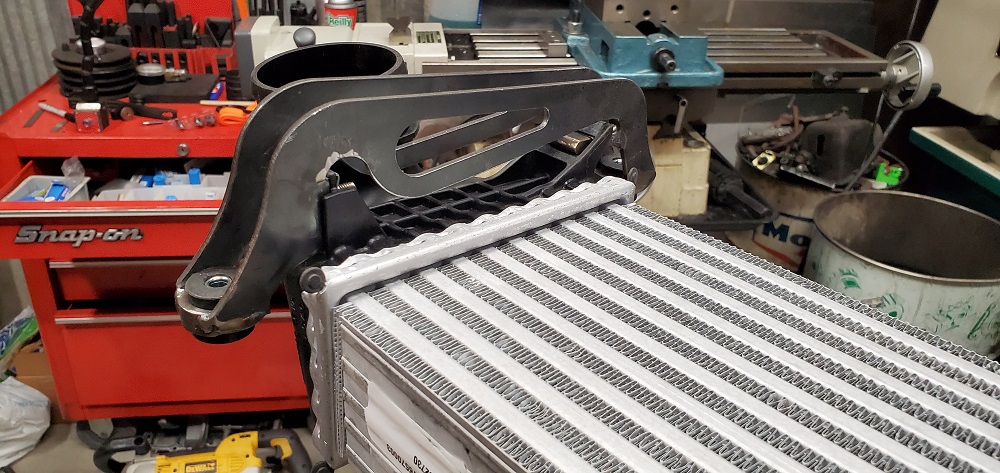
The tab slips into the lower mount, then the bracket swings into place and is secured with 1 screw per side.
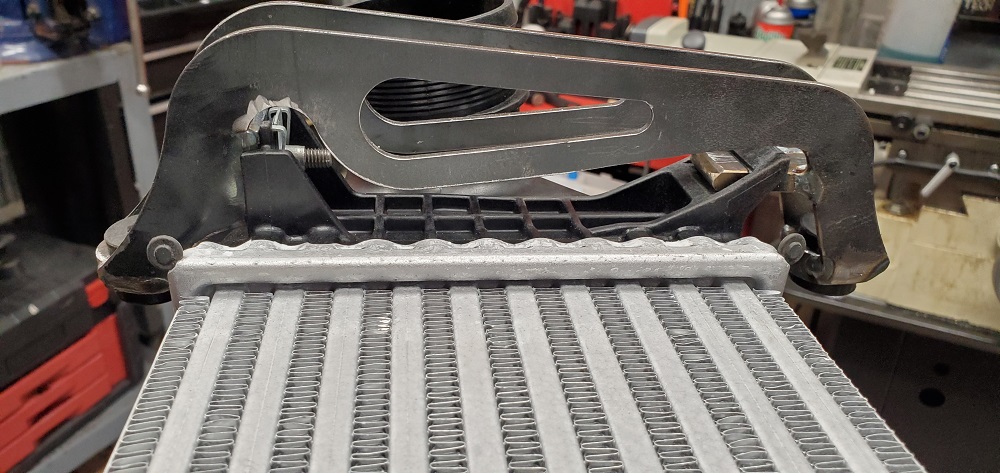
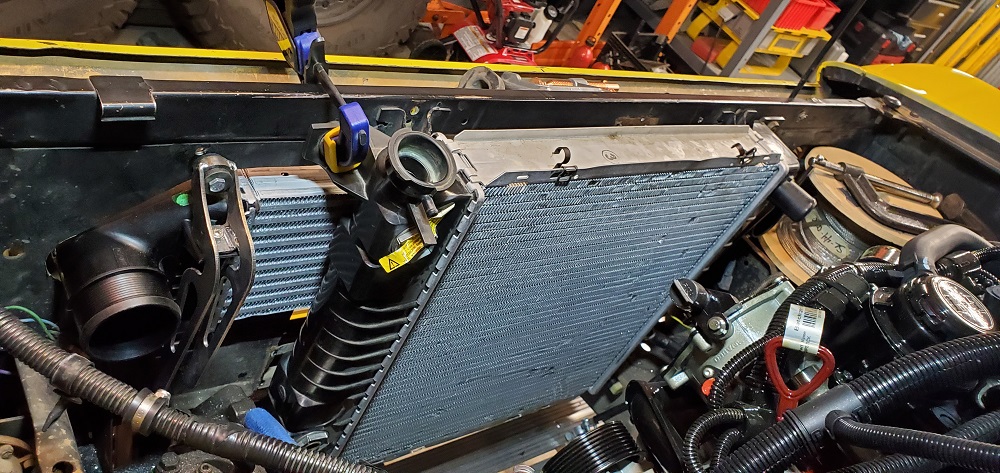
Add some mounting holes in the core support and the intercooler is ready to go.
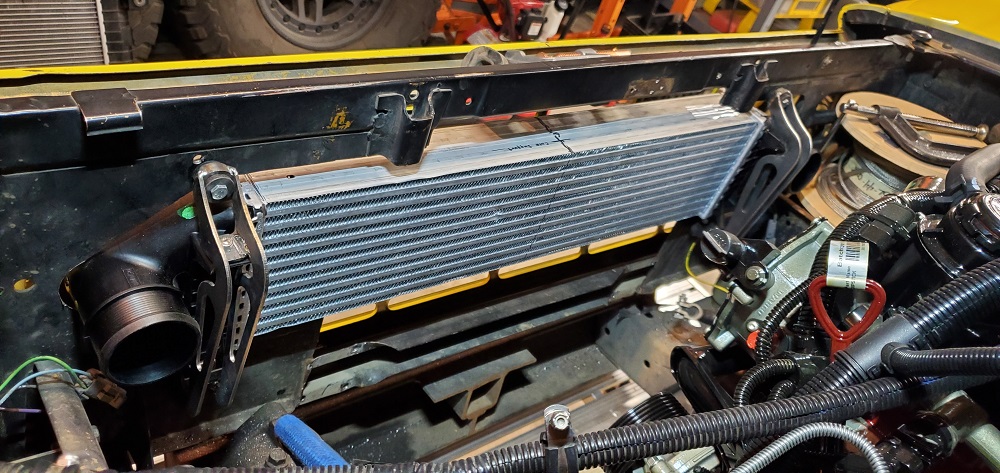
The radiator fits as predicted, but now needs its own set of mounts.
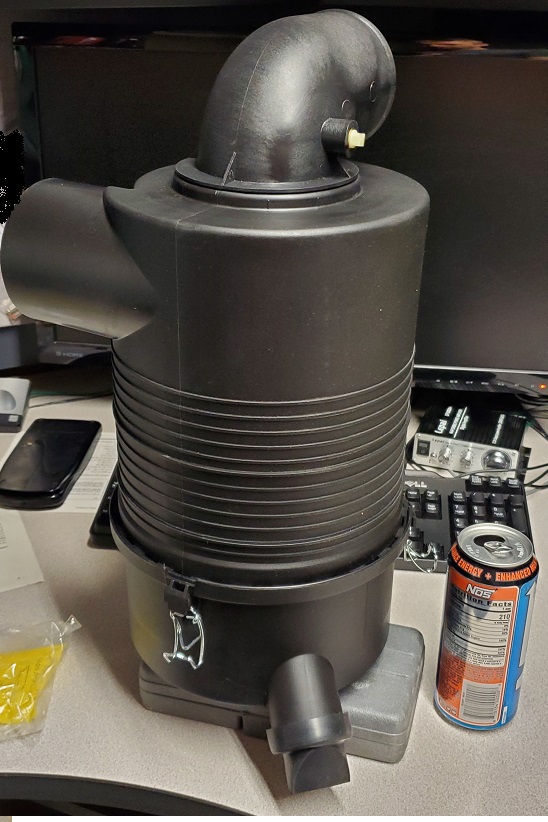
Meanwhile, after many evenings of searching specs, I ordered the smallest Donaldson filter that met Cummins' flow requirements for the R2.8. You really have to read the charts to get the full picture since Donaldson and Cummins rate their filter flows at different restrictions. At ~300 cfm at 12 in of H2O, this unit barely meets spec, but it will hold 8 lbs of dirt before becoming too restrictive. Also, the swirling technology and duckbill valve will keep the majority of the dirt away from the filter. Now the challenge will be finding a home for this thing.

The tab slips into the lower mount, then the bracket swings into place and is secured with 1 screw per side.
Add some mounting holes in the core support and the intercooler is ready to go.
The radiator fits as predicted, but now needs its own set of mounts.
Meanwhile, after many evenings of searching specs, I ordered the smallest Donaldson filter that met Cummins' flow requirements for the R2.8. You really have to read the charts to get the full picture since Donaldson and Cummins rate their filter flows at different restrictions. At ~300 cfm at 12 in of H2O, this unit barely meets spec, but it will hold 8 lbs of dirt before becoming too restrictive. Also, the swirling technology and duckbill valve will keep the majority of the dirt away from the filter. Now the challenge will be finding a home for this thing.
BradtheWelder
Full Member
Looking good! I'm always impressed when people can design things in CAD and get them to work. For me it's always making cardboard templates and "fine adjust" them with a grinder. So basically the opposite of what you do. HAHAHA
ntsqd
heratic car camper
Can't speak for Digger, but for me the process is the same whether I'm shaving cardboard (I prefer manila file folders) or shaving electrons in CAD, it is an iterative solve in both cases.;DLooking good! I'm always impressed when people can design things in CAD and get them to work. For me it's always making cardboard templates and "fine adjust" them with a grinder. So basically the opposite of what you do. HAHAHA
OP
OP
Digger556
Sr. Member
- Joined
- Aug 8, 2013
- Messages
- 793
Can't speak for Digger, but for me the process is the same whether I'm shaving cardboard (I prefer manila file folders) or shaving electrons in CAD, it is an iterative solve in both cases.;D
Sometimes that cardboard process is faster. I like keeping things in CAD just in case I have to rebuild this thing.
ntsqd
heratic car camper
It is easier to "add" material back in CAD than in cardboard.
My EB has Autofab hood pins. I like them a lot, but I do wish for the emergency catch. I know of a few with pins only that have accidentally had the hood hit the windshield frame. Remains to be seen if I want it badly enough to build one.
My EB has Autofab hood pins. I like them a lot, but I do wish for the emergency catch. I know of a few with pins only that have accidentally had the hood hit the windshield frame. Remains to be seen if I want it badly enough to build one.
OP
OP
Digger556
Sr. Member
- Joined
- Aug 8, 2013
- Messages
- 793
I feel kind of stupid giving you a suggestion (mainly because this thread is so impressive) but concerning the hood latch, why not just use hood pins?
I'm always open to ideas and haven't ruled out hood pins yet. The two reasons I'm avoiding them are: I don't like holes in the hood and I want to have a standard safety catch if possible.
dclack
Sr. Member
- Joined
- Feb 16, 2012
- Messages
- 401
I agree. I hate cutting holes in my Bronco and in general, I prefer the stock look. But if I was going to add hood pins, I'd get the Quik-Latch ones. Certainly more expensive, but a nice clean look.
https://www.quik-latch.com/QL-50-Series-Completed-Installations.html
https://www.quik-latch.com/QL-50-Series-Completed-Installations.html
BradtheWelder
Full Member
I'm always open to ideas and haven't ruled out hood pins yet. The two reasons I'm avoiding them are: I don't like holes in the hood and I want to have a standard safety catch if possible.
Same with me. I'm totally all for swapping and entire drivetrain of a vehicle and complete suspension redesign but I don't like putting holes in the hood. I want my Bronco to only look slightly modified to a person that isn't a Bronco historian. I still have no idea what I'm going to do with my hood latch situation.
I actually even traded straight up a near perfect cowl hood for an original stock hood.
OP
OP
Digger556
Sr. Member
- Joined
- Aug 8, 2013
- Messages
- 793
Same with me. I'm totally all for swapping and entire drivetrain of a vehicle and complete suspension redesign but I don't like putting holes in the hood. I want my Bronco to only look slightly modified to a person that isn't a Bronco historian. I still have no idea what I'm going to do with my hood latch situation.
I actually even traded straight up a near perfect cowl hood for an original stock hood.
That's funny you say that, because I want to ditch my cowl hood for a stock one now that it's not required.
Dbteak
Sr. Member
- Joined
- May 23, 2006
- Messages
- 438
I agree. I hate cutting holes in my Bronco and in general, I prefer the stock look. But if I was going to add hood pins, I'd get the Quik-Latch ones. Certainly more expensive, but a nice clean look.
https://www.quik-latch.com/QL-50-Series-Completed-Installations.html
When I mounted my intercooler I also had to lose my latch. I also had concerns with the quik-latch and no secondary latch but I have put 50,000 miles on mine on road and off road and I have never had one unlatch. Getting them aligned is a pain and they put a dent in the credit card. I like the clean look and you can tell if they are latched just by looking at them.
OP
OP
Digger556
Sr. Member
- Joined
- Aug 8, 2013
- Messages
- 793
When I mounted my intercooler I also had to lose my latch. I also had concerns with the quik-latch and no secondary latch but I have put 50,000 miles on mine on road and off road and I have never had one unlatch. Getting them aligned is a pain and they put a dent in the credit card. I like the clean look and you can tell if they are latched just by looking at them.
I went through your build thread. Very nice! Your intercooler position and issues are similar to mine.
Dbteak
Sr. Member
- Joined
- May 23, 2006
- Messages
- 438
I went through your build thread. Very nice! Your intercooler position and issues are similar to mine.
Thanks. You have done an amazing job and I cant wait to see the end product. I thought I would want to try the 2.8 but I'm going to have to wait for someone else to do all the fine machine work.
BradtheWelder
Full Member
Anything new Digger?
cbeveridge
New Member
- Joined
- Nov 6, 2014
- Messages
- 6
Is there any chance that you would be willing to share that cad model? I know that is asking a LOT !!!!!!! because you have hundreds of hours into it. I am going to do a R2.8 swap and you have done all that work. I have solidworks and a CNC table and a weld and fab shop. This thread has been awesome! so much good info and great pictures. No pressure either way, keep up the great work.
Similar threads
- Replies
- 13
- Views
- 710
- Replies
- 37
- Views
- 2K
- Replies
- 190
- Views
- 8K
- Replies
- 0
- Views
- 226