


Community
Buy / Sell


Bronco Tech
3 Arm Wiper Setup
Fix Motor Mount
Roll Cage Braces
Throttle Body 65mm
Wheel Alignment
Heat Riser Replacement
Vent Window Repair
Center Console Mount
Straighten Bumper
Ford 6R80 6 spd
More Tech...
Fix Motor Mount
Roll Cage Braces
Throttle Body 65mm
Wheel Alignment
Heat Riser Replacement
Vent Window Repair
Center Console Mount
Straighten Bumper
Ford 6R80 6 spd
More Tech...

-
Welcome to ClassicBroncos! - You are currently viewing the forums as a GUEST. To take advantage of all the site features, please take a moment to register. It's fast, simple and absolutely free. So please join our community today!If you have problems registering or can't log into your account, please contact Admin.
You are using an out of date browser. It may not display this or other websites correctly.
You should upgrade or use an alternative browser.
You should upgrade or use an alternative browser.
My 351w Explorer EFI conversion thread
- Thread starter pa69broncoguy
- Start date
mjramacher
Full Member
- Joined
- Jul 29, 2012
- Messages
- 301
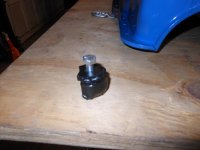
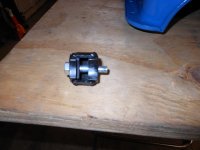
I had collar made up for me it was 110.00$ I didn't want to pay that much but didn't have much choice,the guy at the machine shop said if I wanted 10 made he would do them for 70.00$ a piece.
OP
OP
pa69broncoguy
Sr. Member
- Joined
- Sep 6, 2011
- Messages
- 566
The collar for the cam sensor was so expensive. Is there another solution? I wonder if a 3D printer would be a good candidate for this item.
It does seem a little pricey but when you concider the price of a decent distributor/coil it doesnt seem too bad. I think 3d printers only do plastic dont they??
OP
OP
pa69broncoguy
Sr. Member
- Joined
- Sep 6, 2011
- Messages
- 566
I had collar made up for me it was 110.00$ I didn't want to pay that much but didn't have much choice,the guy at the machine shop said if I wanted 10 made he would do them for 70.00$ a piece.
It would be a little rough to dish out $700 for 10 adapters. Till you shiped them and accounted for your time/inconvenience it would turn into a charity act in no time. I wish there was a better way but I dont know of it yet.
OP
OP
pa69broncoguy
Sr. Member
- Joined
- Sep 6, 2011
- Messages
- 566
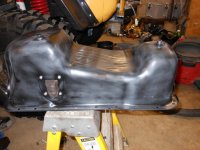
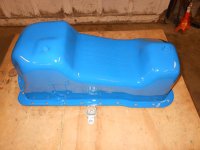
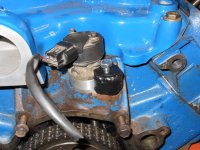
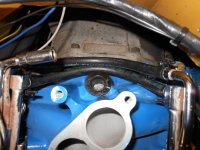
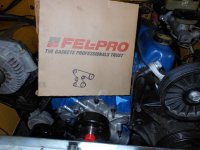
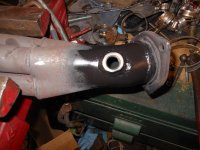
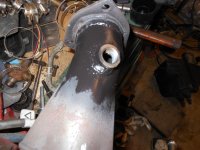
I pulled a bonehead move the other night, i put my heads back on and bolted up my headers. The next day a friend asked if i got the heads put back on and asked if i put the o2 bungs in wile i had the headers unbolted. It was an instant dooooh!!! moment. I pulled the pass side off and got the sensor bung welded in tonight. I cleaned up and reused the explorer bungs. I also painted up my new autozone oil pan tonight too. The paint turned out good i couldnt belive it went so well. The pan and paint were both warm but i took it outside to paint 19* F outside but it sprayed great. It should be dry enough to put on tomorrow.Here are a couple pics.
Attachments


OP
OP
pa69broncoguy
Sr. Member
- Joined
- Sep 6, 2011
- Messages
- 566
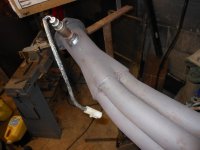
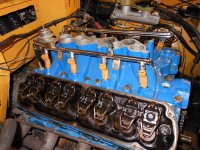
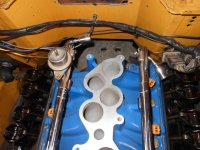
Today i bolted on my new oil pickup, installed my intake manifold and fuel rails. I also hooked up my rear rubber fuel lines that connect the fuel rails and made a hold down for my distributor.
The drivers side fuel rail needed to be modified to clear the firewall and wiring harness. I heated up the fuel rail with a propane torch and the rail bent very easily.
The rubber fuel lines I used are specificly for efi and I used efi clamps. The lines were very snug going on so hopefully they will be good.
I made up the distributor hold down from 2 original hold down brackets then wrapped it in some thick steel and welded it together. It smoked a lot when welded and welded a little weird so im thinking it was cast iron or pressesd metal. I laid the heat to it and threw it in a bucket of ashes when i was done so it would cool slowly. Im thinking it should work out ok since it isnt a high stress area anyway.
Attachments
OP
OP
pa69broncoguy
Sr. Member
- Joined
- Sep 6, 2011
- Messages
- 566
slowly progressing
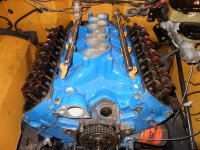
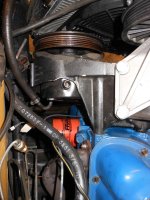
The other nignt I put on the explorer timing cover,rebalanced dampner and water pump.
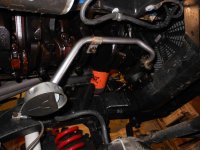
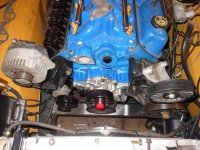
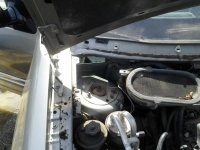
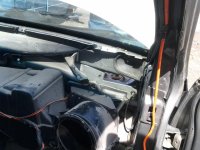
Tonight I started to look at my acessories, I bolted on the alternator/idler/tensioner. I started to look at my ford truck power steering pump mount that I had previously modified to accept the saginaw pump. It looks like i might be able to cut off 2" from the back and it should be lined up just right.
I see that most of the setups have a idler pulley on the top between the ps pump ans the alt. Is this really needed, it looks like it could be done away with on my setup. Any input? Here are a couple pics.
The other nignt I put on the explorer timing cover,rebalanced dampner and water pump.
Tonight I started to look at my acessories, I bolted on the alternator/idler/tensioner. I started to look at my ford truck power steering pump mount that I had previously modified to accept the saginaw pump. It looks like i might be able to cut off 2" from the back and it should be lined up just right.
I see that most of the setups have a idler pulley on the top between the ps pump ans the alt. Is this really needed, it looks like it could be done away with on my setup. Any input? Here are a couple pics.
Attachments
OP
OP
pa69broncoguy
Sr. Member
- Joined
- Sep 6, 2011
- Messages
- 566
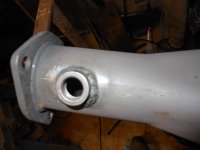
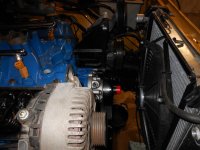
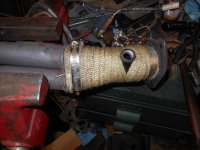
The other night i got my drivers side header pulled and welded in the 02 sensor threaded insert. I wrapped the collector because it is close to my clutch line. I got it all bolted up, hopefully for the last time;D here are a couple pics.
Attachments
mjramacher
Full Member
- Joined
- Jul 29, 2012
- Messages
- 301
its looking good I am getting my motor back today I will start putting some paint on this weekend I glad somebody else was doing this same swap at the right time I hope it all went well for ya so far I do have one question did your cam sync collar require a o-ring and if so where did you get it.")
Last edited:
OP
OP
pa69broncoguy
Sr. Member
- Joined
- Sep 6, 2011
- Messages
- 566
mjramacher, there will be an o-ring. Im planning on just re-using the o-ring off my distributor ,it should be fine because the specs are the same as the outside of the distributor.
mjramacher
Full Member
- Joined
- Jul 29, 2012
- Messages
- 301
thanks that's what I thought but was not sure keep up the good work I will be starting mine tomorrow I am excited been waiting almost two months for this.
OP
OP
pa69broncoguy
Sr. Member
- Joined
- Sep 6, 2011
- Messages
- 566
keep going! my build is stagnant and this keeps reviving me! MEB Round Up with it this year?
I drove it to the roundup in gore last year with the carb. This year I plan to drive it to the roundup too ,hopefully with the efi done
It looks like it should be about the same distance for me to both places about 4 hours.
OP
OP
pa69broncoguy
Sr. Member
- Joined
- Sep 6, 2011
- Messages
- 566
thanks that's what I thought but was not sure keep up the good work I will be starting mine tomorrow I am excited been waiting almost two months for this.
Glad your enjoying the thread, Its always exciting to start a new project. It always motivates me when I see what everyone else is doing. It seems like such a huge project but if you break it down and concentrate on one thing at a time its not really as large as it seems. Im getting anxious to see how it works, hopefully we will find out fairly soon, just a couple things left to take care of.
OP
OP
pa69broncoguy
Sr. Member
- Joined
- Sep 6, 2011
- Messages
- 566
hopefully i can check it out....gotta get moving. Would love to have mine there this year as well
I hope you can check it out too
What are you wanting to bring to the roundup, the bocci or paid-4
OP
OP
pa69broncoguy
Sr. Member
- Joined
- Sep 6, 2011
- Messages
- 566
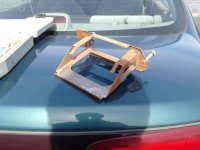
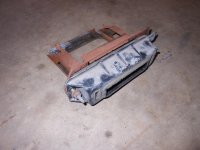
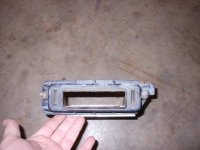
I picked up a 02 windstar computer mount the other day, I think it will work much better than the explorer one. It looks like it will push it out about 2" from the firewall. It took quite a bit more to get it out than i thought it would but they only charged me $1 for it. What a score. Here are some pics.
Attachments

Similar threads
- Replies
- 4
- Views
- 2K
- Locked
- Replies
- 9
- Views
- 3K